This method helps highlight blank cells after unmerging, using the value from the cell above — perfect for keeping formatting consistent in vertically grouped data.
The Problem with Unmerged Cells
Instead of repeating the same value in every row, we often merge cells in spreadsheets for a cleaner visual layout. For example, if “Cucumber” is repeated from A1 to A4, you might just enter it in A1 and merge A1:A4.
When the cells are merged, conditional formatting works exactly as expected. Say you want to highlight “Cucumber” in column A, you can use a simple formula like:
=A1="Cucumber"This works beautifully — until you unmerge the cells.
Once unmerged, only the cell that originally held the value (A1 in this case) remains highlighted. The rest — now blank — lose the formatting.
So how do you highlight blank cells using the value above, especially after unmerging?
What We Want to Achieve
We want to preserve the visual grouping and highlight all blank cells that originally belonged to a merged section — based on the value above. For instance, if “Cucumber” is in A1 and “Lettuce” is in A5, we want to highlight A1 through A4, and A5 through A10 for “Lettuce”, and so on.
This approach is particularly useful when you’re trying to clean up merged ranges but still want to highlight blanks after unmerging cells in Google Sheets.
The Data Setup
Let’s assume you have the following values in column A:
A1: Cucumber
A2:
A3:
A4:
A5: Lettuce
A6:
A7:
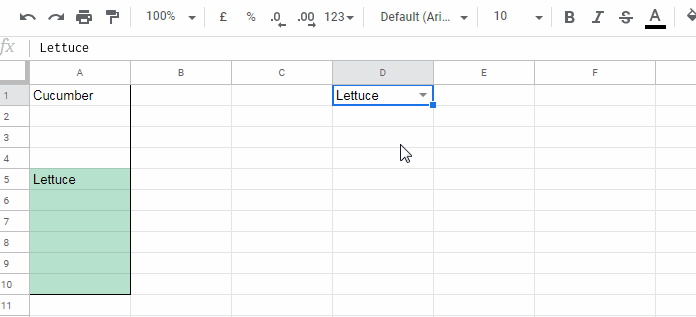
To allow flexible highlighting, we’ll use a dropdown in another cell (D1) to choose which value to highlight.
Create the Dropdown in D1
- Select cell D1
- Click Insert > Dropdown
- Under Criteria, choose Dropdown from a range
- In the field, enter
A1:A - Click Done
Now D1 lets you select any value from column A to highlight.
Formula to Highlight Blank Cells Using Value Above
Use the following formula in conditional formatting to apply smart highlighting based on the selected value in D1:
=LET(
   range, $A$1:$A,
   rn, ARRAYFORMULA(ROW(range)),
   start, XLOOKUP($D$1, range, rn),
   nblank, TOCOL(range, 3),
   end, XLOOKUP(INDEX(nblank, XMATCH($D$1, nblank)+1), range, rn)-1,
   endf, IFNA(IF(ERROR.TYPE(end)=4, ROWS(range)), end),
   ISBETWEEN(ROW(A1), start, endf)
)$A$1:$A: Your full target range$D$1: The selected value to matchA1: The first cell in the range for conditional formatting
Apply the Conditional Formatting Rule
To highlight blank cells after unmerging using the formula above:
- Copy the formula
- Select your range, e.g.,
A1:A - Go to Format > Conditional Formatting
- Under “Format Rules,” choose Custom formula is
- Paste the formula
- Choose a formatting style
- Click Done
This highlights the selected value from D1 and all the empty cells below it — up to the next non-empty cell.
Want to Exclude the Value Cell Itself?
If you want to highlight only the blank cells below the selected value — and exclude the cell that contains the value itself — just make a small tweak to the formula.
Replace:
ISBETWEEN(ROW(A1), start, endf)with:
ISBETWEEN(ROW(A1), start+1, endf)This change shifts the start of the highlight one row below the matched value, so the value cell itself is not included.
Highlight Blanks After Unmerging — Formula Explained
Here’s a quick breakdown of the logic:
=LET(
   range, $A$1:$A,
   rn, ARRAYFORMULA(ROW(range)),
   start, XLOOKUP($D$1, range, rn),
   nblank, TOCOL(range, 3),
   end, XLOOKUP(INDEX(nblank, XMATCH($D$1, nblank)+1), range, rn)-1,
   endf, IFNA(IF(ERROR.TYPE(end)=4, ROWS(range)), end),
   ISBETWEEN(ROW(A1), start, endf)
)rn: Gets row numbers for the entire rangestart: Finds the row number where your selected value (from D1) first appears in the range.nblank: Converts the column into a vertical list and removes empty cells — so we can more easily find what value comes after the current one.end: Locates the row number of the next non-empty value after your selected value, and subtracts 1 to highlight up to the row just before the next value.endf: This is a safety step. If your selected value is the last one in the list, theendstep would throw a#REF!error because there’s no “next value” to find. Soendfcatches that and instead returns the last row number of the range — ensuring the highlight extends all the way to the bottom if needed.ISBETWEEN(...): Checks if the current row lies betweenstartandendf— if yes, it’s highlighted
Why This Is Better Than Merged Cells
Using merged cells may look tidy, but they create all sorts of problems — especially with filtering, sorting, formulas, and data validation. You might highlight a merged range using a simple rule like:
=A1="Cucumber"That works while the cells are merged. But the moment you unmerge, only the first cell (A1) remains highlighted — and the formatting for A2, A3, A4, etc. disappears.
That’s where this method shines.
By unmerging your cells and using the “highlight blanks using the value above” approach described in this post, the formatting stays intact — even across blank rows. It gives you the best of both worlds: clean, structured data and persistent visual grouping.
It also makes your spreadsheet much easier to automate, maintain, and analyze.
Conclusion
This approach lets you maintain clear visual grouping even after unmerging cells, while keeping your data structure clean and formula-friendly.
To explore more ways to handle blanks, dynamic ranges, and advanced conditional formatting scenarios, check out the Ultimate Guide to Conditional Formatting in Google Sheets, where a wide range of related techniques are covered.
Example Sheet
You can check this out in the example:


