First line and hanging indents are two popular typographic features in word processors, and Google Docs is no exception. These two text formatting styles are part of standard typographic conventions.
What does “First Line Indent” mean?
The first line of a paragraph is indented inward from the left margin. This formatting is most commonly used in novels, reports, emails, business correspondence, research papers, etc.
What does “Hanging Indent” mean?
In this style, the first line of a paragraph is aligned with the left margin, while all following lines are indented inward. Hanging indents are commonly used in documents such as bibliographies, reference lists, outlines, and bulleted lists.
When using Google Docs, you can easily create the first line or hanging indent with the desired indent size in a flash.
Applying First Line Indent in Google Docs
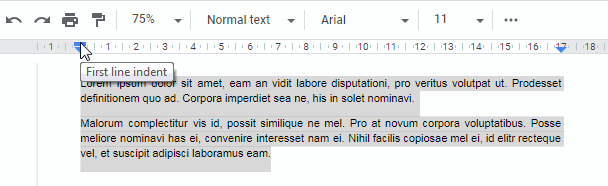
The easiest way to create a first-line indent in Google Docs is to use the marker on the horizontal ruler.
Here are the steps to follow:
- Make sure to click on the “View” menu and check the “Ruler” option.
- Select the paragraph(s) in which you want to apply the first-line indent formatting.
- Hover your mouse pointer over the top portion of the marker on the ruler. You’ll see the label “First line indent” appear after a moment.
- Click and drag the marker to the desired position to the right.
Alternatively,
- Click on the “Format” menu and go to “Align and Indent” and then select “Indentation Options.”
- In the “Indentation options” box that appears, under “Special indent,” choose “First Line.”
- This will create a field where you can enter the desired spacing in centimeters. For example, type “2” and click “Apply.”
Applying Hanging Indent in Google Docs
Similar to the first line indent, the easiest way to create a hanging indent in Google Docs is to use the marker on the horizontal ruler.
Here are the steps to follow:
- Ensure that you click on the “View” menu and check the “Ruler” option.
- Select the paragraphs you want to apply the hanging indent formatting.
- Hover your mouse pointer over the bottom portion of the marker on the ruler. You’ll see the label “left indent” appear after a moment. Click and drag the marker to the desired position to the right.
- Hover your mouse pointer over the top portion of the marker. The label “First line indent” appears after a moment. Click and drag the marker to the left to align with the margin.
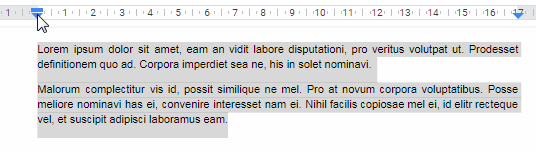
You have now applied the hanging indent to the selected paragraphs.
Alternatively, you can use the menu command. Here is the alternative approach:
- Click on the “Format” menu and go to “Align and Indent” and then select “Indentation Options.”
- In the “Indentation options” box that appears, under “Special indent,” choose “Hanging.”
- This will create a field where you can enter the desired spacing in centimeters. For example, type “2” and click “Apply.”


