A clickable table of contents (TOC) in a Google Docs document provides a quick overview of the content and makes navigation easier.
You must structure your document with appropriate text styling to create a clickable table of contents in Google Docs.
The purpose of a table of contents (TOC) in digital documents created using Google Docs remains largely the same as in print documents. However, there are added advantages, and here are two important ones:
- The TOCs in Google Docs include hyperlinks, allowing readers to click on a heading in the TOC and instantly navigate to the corresponding section in the document.
- Another advantage is that TOCs can be dynamically updated to reflect changes in the document’s structure. For example, if headings or subheadings are added, removed, or reorganized, the TOC in Docs can be updated with a click to reflect these changes, ensuring that it remains accurate and up to date.
Styling Document Titles, Headings, and Subheadings
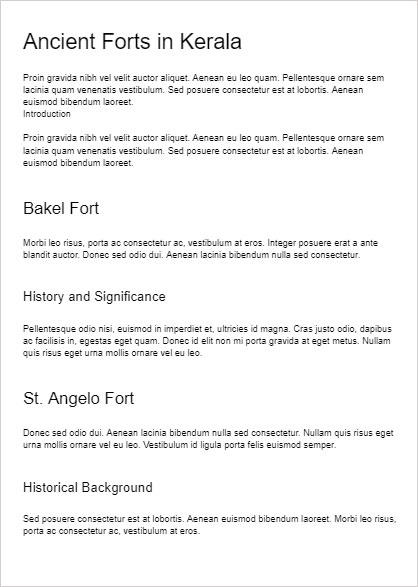
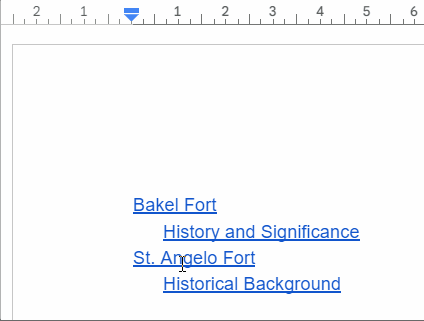
For example, let’s say you’ve drafted a document in Google Docs titled “Ancient Forts in Kerala”.
The headings are “Introduction”, “Bakel Fort”, and “St. Angelo Fort”.
The subheading under “Bakel Fort” is “History and Significance”, and under “St. Angelo Fort” is “Historical Background”.
To format your document:
- Begin by going to the Edit menu and selecting ‘Select All’. Alternatively, you can use the shortcut keys Ctrl + A (Windows) or Command + A (Mac) on your keyboard.
- Once all the text is selected, navigate to the Format menu and choose ‘Paragraphs and styles’> ‘Normal text’ > ‘Apply normal text’.
This clears any existing styles and reverts the text to normal formatting. - Select the title “Ancient Forts in Kerala” and go to the Format menu. Choose ‘Paragraphs and styles’ > ‘Title’ > ‘Apply title’.
- Apply the style “Heading 1” to the headings “Introduction”, “Bakel Fort”, and “St. Angelo Fort”.
- Similarly, apply “Heading 2” to the subheadings “History and Significance” and “Historical Background”.
Your formatting is now complete.
Note: You can select paragraph styles from the Styles pane by clicking the small arrow next to the font style selection box. This method is quicker compared to the Format menu options mentioned above.
Creating a Clickable Table of Contents in Google Docs
Now that you’re ready, let’s insert the clickable table of contents in Google Docs.
- Go to the Insert menu and scroll down to the bottom. Select “Table of contents.” You’ll see options such as plain text, dotted, and links. Choose the one you prefer. The visual representation will help you understand their actual roles, or you can try each one of them for comparison.
- For example, let’s select “links.” Docs will insert the TOC at the cursor position.
- Clicking on the TOC headings and subheadings will take you to the corresponding sections.
This is the quickest way to insert a clickable TOC in Google Docs.
Updating the Clickable Table of Contents After Changes to the Document
Of course, there are chances of modifications to a document as it’s electronic, not printed. Your headings may change positions, subject to deletion, or new headings and subheadings may be added.
To update the clickable Table of Contents, click within the TOC box (in an empty area) and then click on the refresh button.
Conclusion
As you have seen, creating a clickable table of contents is quite easy in Google Docs. This will help you easily navigate to the content you want and also aid in understanding the content.
Google Docs offers the ability to download documents in various formats. If you download a Google Docs document that contains a clickable TOC in PDF format, it will retain the TOC with links.


Thank you! Who knew those Headings were so versatile!