Here we’ll explore the two best methods for referencing a column by its field label (header row value) in the Google Sheets QUERY: Named Function and LET. You can choose between them based on your preference.
The QUERY function supports two types of column identifiers to reference columns: letters such as A, B, …, Z, AA, AB, …, or Col1, Col2, …, Col26, Col27, Col28, …, which are position-based identifiers.
However, it doesn’t inherently identify a column by its label. For example, if your data is in range A1:C and A1, B1, and C1 contain the headers (labels) “Name,” “Dept,” and “Salary,” you can’t select column B directly as follows:
=QUERY(A1:C, "SELECT Dept", 1)Instead, you can use either of the following formulas:
=QUERY(A1:C, "SELECT B", 1)
=QUERY({A1:C}, "SELECT Col2", 1)
This tutorial demonstrates how to reference columns by field labels (header row values) in Google Sheets QUERY.
According to our solution, you can replace both B and Col2 with "&Dept&" (in the LET approach) or "&ID("Dept")&" (in the custom function method).
Reference a Column by Field Label in QUERY: Using a Named Function
In this approach, we will first create a named function called ID. If you are already using a named function with this name, please choose another meaningful name instead.
Creating the Named Function ID
- Open the file and the particular sheet in which you want to use field labels to reference columns in your QUERY formula.
- Click on the “Data” menu, then select “Named functions.”
- Click “Add new function” in the sidebar panel.
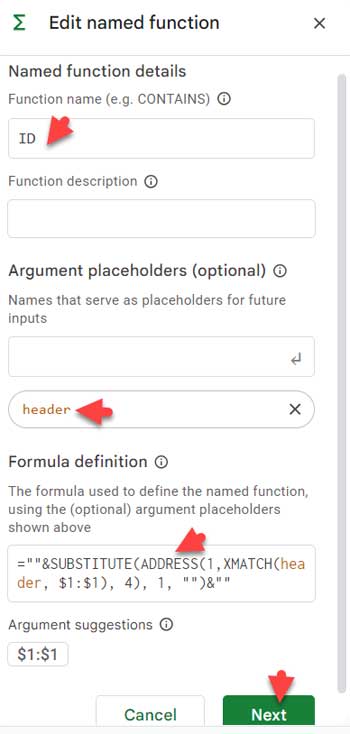
- In the field under ‘Function name’, enter
ID. - In the field under ‘Argument placeholders’, enter
headerand hit the enter key. - Then, click the field under the ‘Formula definition’ and copy-paste the following code:
=""&SUBSTITUTE(ADDRESS(1,XMATCH(header, $1:$1), 4), 1, "")&"" - Replace
$1:$1(represents entire row #1) with the header row reference of your data range in the code. - Click “Next > Create.”

Using the Named Function within QUERY
You are now set to use header row values in your QUERY formula to reference columns. You can refer to field labels using the notation "&ID("label")&", which involves using the named function ID followed by the label name within double quotation marks. Please see the examples below:
Example 1:
Formula Using Column Letters as Identifiers:
=QUERY(A1:D," SELECT A, C WHERE B = 'Eng'", 1)Formula Using Field Labels (Header Row Values) as Identifiers:
=QUERY(A1:D," SELECT "&ID("name")&", "&ID("salary")&" WHERE "&ID("dept")&" = 'Eng'", 1)These formulas select the name and salary where the department matches “Eng”.

Example 2:
This formula selects the department column, removes blanks, and sums the salary while grouping by department.
=QUERY(A1:D," SELECT B, SUM(C) WHERE B IS NOT NULL GROUP BY B ", 1)Here is the corresponding formula which uses field labels instead of letters as column identifiers.
=QUERY(A1:D," SELECT "&ID("dept")&", SUM("&ID("salary")&") WHERE "&ID("dept")&" IS NOT NULL GROUP BY "&ID("dept")&" ", 1)This is the best option to select columns by field labels in Google Sheets QUERY.
Note: The field labels (header row values) are case-insensitive in the formula.
Pros and Cons
Pros: Your formula will always refer to the correct columns in the data. If you move the columns within the dataset, it will adjust accordingly.
Cons:
- It will only work in the specific sheet in which you created the named function.
- It will match the header row values only in the specified row in the ID function.
Reference a Column by Field Label in QUERY: Using LET Function
When you follow this LET approach, ensure that your header row values do not:
- match cell or range references like A1, PQ1, etc.
- contain spaces or special characters (except underscores, as they are not considered special and can be used).
- Start with numbers, such as ‘1st’.
For example, if your field label is “Hire Date,” replace it with “Hire_Date” or “HireDate”. Similarly, if your field label is “Jan1”, replace it with “Jan_1” as “Jan1” may be mistaken for a cell reference.
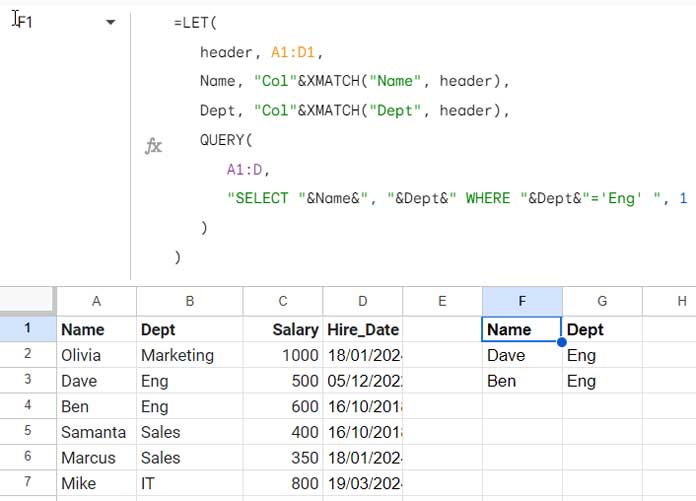
Our sample data in range A1:D meets these conditions within the header row range A1:D1. Please scroll down to see the image below.
Below is an example demonstrating how to reference columns by their field labels in the QUERY function:
=LET(
   header, A1:D1,
   Name, "Col"&XMATCH("Name", header),
   Dept, "Col"&XMATCH("Dept", header),
   QUERY(
      A1:D,
      "SELECT "&Name&", "&Dept&" WHERE "&Dept&"='Eng' ", 1
   )
)
In this query statement, the field labels “Name” and “Dept” are used to reference columns A and B, respectively. These labels are utilized in the notation "&label&", where “label” represents the field label (header row value).
The formula selects Name and Dept columns, where Dept matches “Eng”.

Here’s another example:
=LET(
   header, A1:D1,
   Dept, "Col"&XMATCH("Dept", header),
   Salary, "Col"&XMATCH("Salary", header),
   QUERY(
      A1:D,
      "SELECT "&Dept&", SUM("&Salary&") WHERE "&Dept&" IS NOT NULL GROUP BY "&Dept&" ",1
   )
)
This formula will select and group by department, remove blank rows in the department column, and aggregate the salary.
Now, let me explain how to modify this formula to adapt it to your data.
header, A1:D1: Replace A1:D1 with the header row reference of your data.Dept, "Col"&XMATCH("Dept", header): Specifies the first column to use in the query statement.Salary, "Col"&XMATCH("Salary", header): Specifies the second column to use in the query statement.- Similarly, specify all columns you want to use.
- In QUERY, replace A1:D with your data range.
- In the query statement, use the
"&label&"notation to reference the specified columns in the LET.
Note: The field labels (header row values) are case-insensitive in the formula.
Pros and Cons:
Pros:
- Your formula will always refer to the correct column. So, if you shuffle columns, the formula will correct automatically.
- It’s not limited to any specific sheet as there is no named function in use.
Cons: You can’t use spaces, special characters, and numbers (in most cases) with the headers in your source data.


