Google Sheets has no built-in Dot chart to choose from the chart options so far. Then how to create Dot plots in Google Sheets?
In Dot plots, aka Dot chart, which is one of the simple statistical Plots, we use dots to display data.
The resembling two graphs available to the said chart in Google Sheets are the Scatter chart and the Bubble chart.
From this, we can use the Scatter chart to create Dot plots in Google Sheets.
How?
We must present the data in an entirely different way. So the Scatter chart will look like a Dot chart. How to format the data then?
We can format the data using formulas and create dot plots using a Scatter chart in Google Sheets.
This post has all the necessary instructions and formulas.
Examples to Dot Plots in Google Sheets
Depending upon your data, you may need to use different formatting to create Dot plots in Google Sheets.
Keeping that in mind, I am going to provide you two examples.
The formulas that we may want to use will vary depending on the types of data in hand.
Dot Chart Example 1 (Y-Axis Scale Not Required)
This type of chart is suitable to plot survey data (distribution/relationship of two variables).
In the first example, I have the below data that shows how long students take time to complete one math problem.
| Minutes | Students |
| 1 | 1 |
| 2 | 3 |
| 3 | 4 |
| 4 | 2 |
| 5 | 10 |
| 6 | 1 |
| 7 | 0 |
| 8 | 0 |
| 9 | 1 |
| 10 | 3 |
The above data is in A1:B11 in my sheet.
Here are the step by step instructions to plot the Dot chart in Google Sheets.
Data Formatting Steps for Example 1
1. In cell D1, insert the below ArrayFormula to copy the A1:A11 values to D1:D11.
=ArrayFormula(A1:A11)Alternatively, you can copy-paste (Ctrl+C, Ctrl+V) the A1:A11 values to D1:D11. But, later on, when you update any value in the range A1:A11, it won’t reflect in your chart.
2. In cell D2, enter the below Sequence formula and drag-down until D11.
=sequence(1,B2:B11)Now the data will look-like as below.
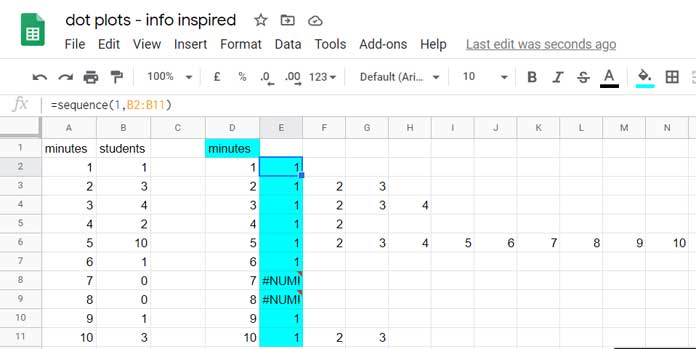
Dot Plots Making Steps for Example 1
1. Select the range D1:N11 and go to the menu Insert > Chart.
2. Select the Chart Type “Scatter” from the drop-down.
3. You will get draft Dot plots in Google Sheets as below. Double click on the Legend icons and delete it using the Delete button on your keyboard.
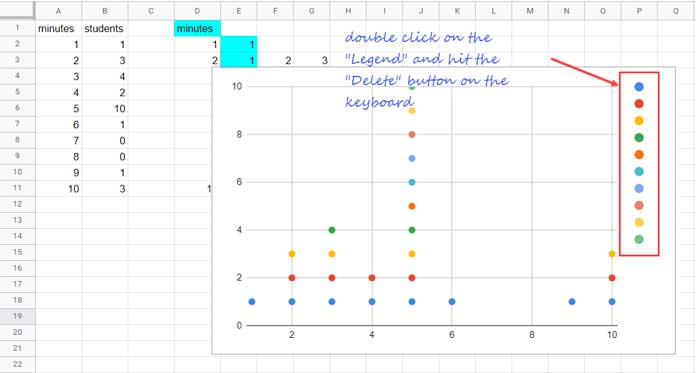
4. Finally, if you don’t want, you can ‘remove’ the scale on the y-axis (left/vertical axis). You can’t remove it. Just mask it by changing the font color to white.
Why does the scale is not required on the Y-axis?
Because we want to only count the dots on the vertical axis.
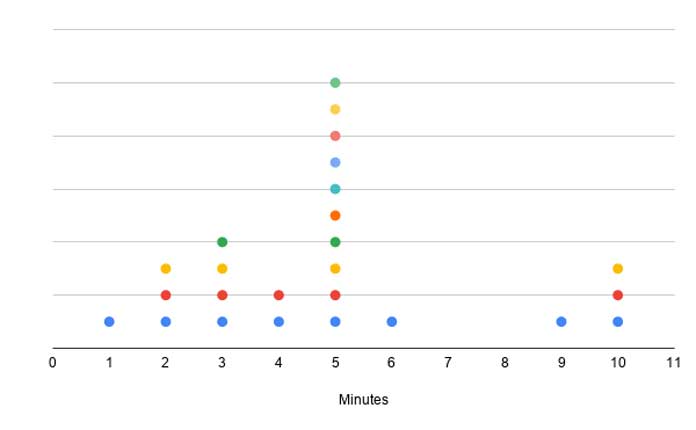
For example, see number 5 on the X-axis (horizontal axis) on the below chart. Just count the dots. You will get 10.
That means 5 students took 10 minutes each to complete their problem. Further, the Dots (series points) on the plot are at equal distance.
To mask the vertical axis values, go to Vertical axis > Text-color within the chart editor ‘Customize’ panel.
So the finished Dot plots in Google Sheets as per the above sample data would look like as below.
To refer to the complete chart settings, you can see my example sheet that shared at the end of this post.
Let’s go to our example 2.
Example 2 – (Y-Axis Scale Required)
This type of chart is suitable to plot comparison of data (changing over time).
Let’s consider item-wise sales of 2 products in quarter 1 (January to March).
| Item 1 | Item 2 |
| 5 | 15 |
| 15 | 6 |
| 20 | 25 |
Here I am going to use three formulas to format the above data suitable for the Dot plots in Google Sheets.
Please note that the formula and data formatting have not even any distant relationship with our example one.
The reason, both data for creating Dot charts are of different types.
Let’s go to the steps.
Data Formatting Steps for Example 2
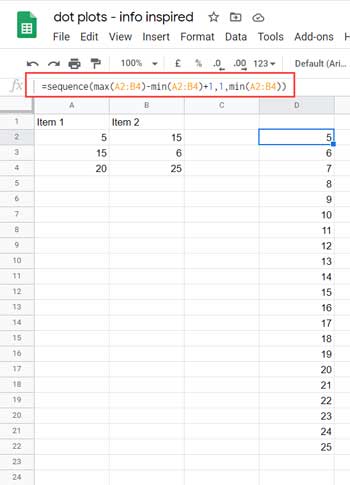
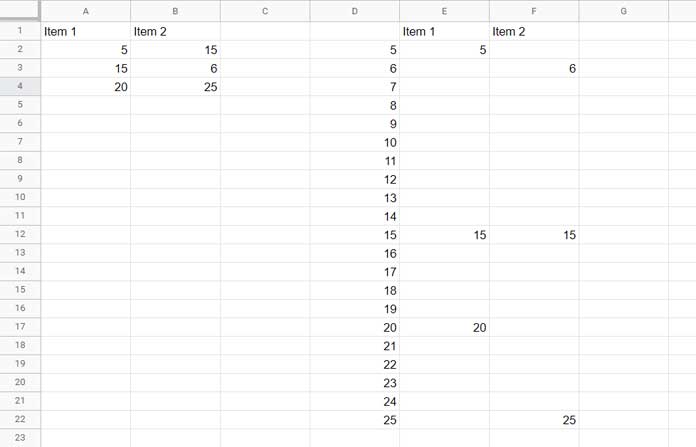
Assume our above sample data is in the range A1:B4. If so, enter the following three formulas in the cells D2, E2, and F2 respectively.
Formula in D2:
=sequence(max(A2:B4)-min(A2:B4)+1,1,min(A2:B4))This formula generates sequential numbers from the Min value in the range A2:B4 to the Max value in the range A2:B4.
That means it will return the numbers from 5 to 25 in ascending order.
Formula in E2:
=ArrayFormula(ifna(vlookup($D$2:$D$22,A2:A4,1,0),))It is a Vlookup array formula that returns values from A2:A4 against corresponding values in D2:D22.
Formula in F2:
=ArrayFormula(ifna(vlookup($D$2:$D$22,B2:B4,1,0),))Just drag the E2 formula to F2 to get the above formula. The purpose here is the same. Here the values from B2:B4 will be returned.
Label E1 as “Item 1” and F1 as “Item 2”.
That’s all that you want to do in the formatting part to make Dot plots in Google Sheets from the sales data above.
Dot Plots Making Steps for Example 2
Here are the steps to follow that are almost similar to our example 1.
1. Select the range D1:F22.
2. Go to Insert > Chart > Scatter chart.
3. Under the chart editor “Setup” tab, enable “Switch row to columns”.
4. Double click on the legend and hit the ‘Delete’ button to remove the Legends as per example 1.
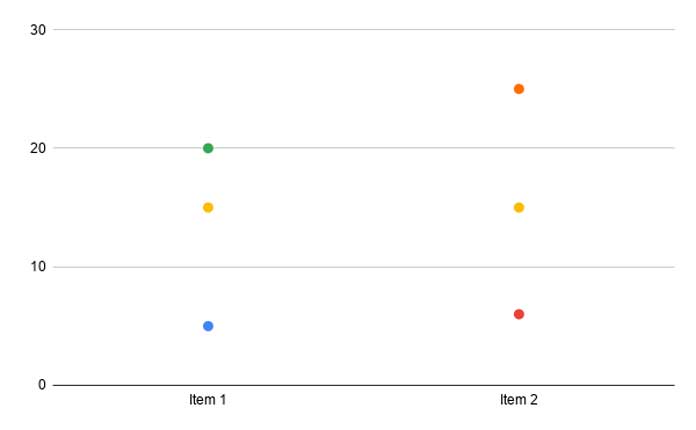
The finished Dot plots in Google Sheets as per example 2 will be as below.
That’s all. Enjoy!


