I have several tutorials related to data validation. But, there is no post so far w.r.t. validate comma-separated numbers within a specific range in Google Sheets.
In this post, you can learn to validate comma-separated numbers in a cell in Google Sheets.
I mean, test whether those numbers are within a min and max value.
I will come to the data validation part later. First, let’s test whether the comma-separated numbers are within a specific range.
Here is a simple example that anybody can follow.
Test Whether the Comma-Separated Numbers Are within a Specific Range in Google Sheets
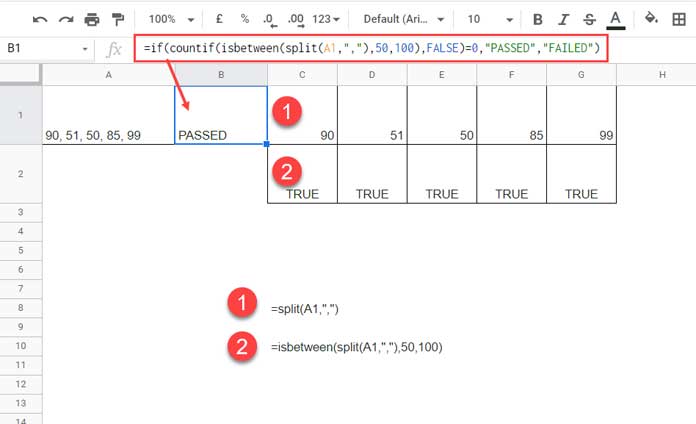
We have a list of numbers in cell A1 (delimited by commas) in a Google Spreadsheet.
Before entering the values, I have formatted cell A1 to text. You can do that by selecting Format > Number > Plain text.
It’s important. Do you know the reason?
Otherwise, when you enter values such as 7, 3, 22 (there is a white space after every comma), Google Sheets may treat it as a date, i.e., 7th March 2022, depending on your Locale settings.
By formatting as above, we can avoid such issues. Now let’s go to the example.
The marks of a student out of 100 in five subjects in an exam are entered in cell A1 as follows – 90, 55, 45, 85, 99.
The pass mark is 50 in all subjects.
I want to test whether the marks are within the range of 50 – 100.
In the above test, I expect the formula to return the string “FAILED” because the marks in one of the subjects are 45, i.e., less than 50.
How do I test whether the comma-separated numbers are within the specific range, here 50-100, in Google Sheets?
In cell B1, enter the following combination formula.
Formula_1
=countif(isbetween(split(A1,","),50,100),FALSE)=0It will return TRUE or FALSE. In our case, the output will be FALSE.
Let’s add an IF logical test to return “FAILED” instead of FALSE.
Formula_2
=if(countif(isbetween(split(A1,","),50,100),FALSE)=0,"PASSED","FAILED")Before going to the data validation part, let’s learn this formula.
Formula Explanation
There are four parts to the formula, including the IF logical test.
- The SPLIT separates the numbers (marks) into five cells. Please see the screenshot_1, point # 1 below.
- With the help of ISBETWEEN, we can test if the numbers are within the min and max number, here 50 and 100. The output will be TRUE for ‘within’ and FALSE for ‘outside’ the range (please see the screenshot_1, point # 2 below).
- The COUNTIF returns the count of FALSE values returned by the ISBETWEEN formula. If the output is 0, the comma-separated numbers are within the specified range.
- The IF logical test returns “PASSED” if the output is 0 (zero) and “FAILED” if not.

Comma Separated Numbers within Specific Range – Data Validation
In data validation, we can use formula_1. That means we don’t want the IF logical part.
Additionally, we can use cell references instead of hard-coding the min and max numbers into the formula. It will bring flexibility.
I mean, by doing so, if you want, you can later change min and max values without modifying the validation rule.
Here is an example to validate comma-separated numbers within a specific range in Google Sheets.
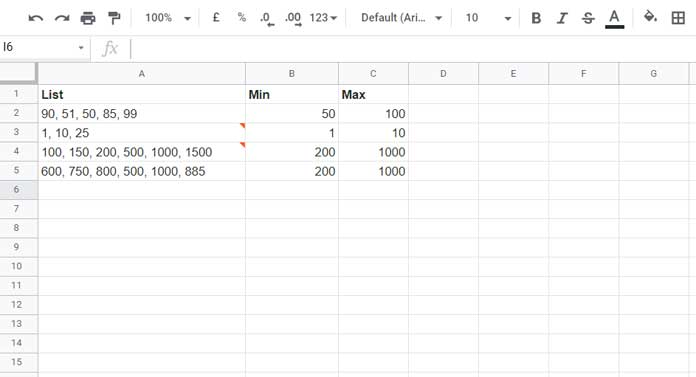
I have the following list of comma-separated numbers to validate in A2:A5 and their min and max values in B2:B5 and C2:C5, respectively.

Please follow the below steps to apply the data validation rule.
- Select Data > Data validation.
- Cell range > A2:A5 – It is the array in which we want to validate the comma-separated numbers within their specified ranges.
- Criteria > Custom formula is. Enter
=countif(isbetween(split(A2,","),B2,C2),FALSE)=0in the blank field. - Select “Show warning” or “Reject input.” I am selecting the former one.
- Select “Save.”
The above validation fails in cells A3 and A4 since there are numbers in the comma-separated values that are outside their specified range.
That’s all. Thanks for the stay. Enjoy!
Related Resources
- Extract Unique Values from a Comma Separated List in Google Sheets.
- Vlookup and Comma-Separated Values – Google Sheets Tips.
- Comma-Separated Values as Criteria in Filter Function in Google Sheets.
- Remove Duplicates from Comma-Delimited Strings in Google Sheets.
- How to Compare Comma-Separated Values in Google Sheets.


