")
")


")


")

")
")
 in Excel & Google Sheets")


You can find the download link below for our free automated employee timesheet template for Google Sheets.
Since it’s automated, there’s a control panel to manage the formulas that calculate regular hours, overtime hours, and total hours.
The control panel allows you to set the timesheet start and end date, specify the standard regular working hours in your organization, define lunch break duration, select weekends, and specify holidays.
Additionally, it includes a feature to toggle regular hours on weekends/holidays and consider them as overtime hours.
Outside the control panel, for each start and end time, you can turn on/off the lunch break time.
The template is easy to use once you set the control panel values based on your requirements. Then, you just need to enter the start and end times. The formulas will calculate the regular hours, overtime hours, and total worked hours.
Understanding the Employee Timesheet Interface
The timesheet is spread across the cell range B4:L36, suitable for recording an employee’s maximum of one month of work hours.
The header row, i.e., B4:L1, contains the field labels. You should only edit the columns containing the field label with a pencil character.
The field labels are as follows:
DATE START TIME [✎] | FINISH TIME [✎] | BREAK [✎] | REGULAR HOURS | OVERTIME HOURS | WORK STATUS | SICK [✎] | VACATION [✎] | OTHER [✎] | TOTAL HOURS
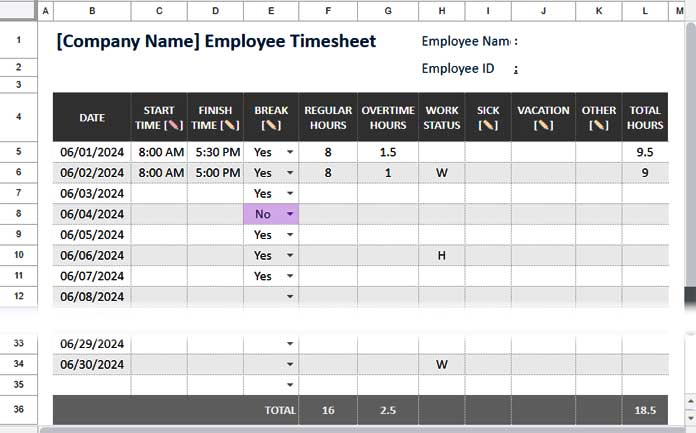
Enter the work start time in column C, the work end time in column D, and select the lunch break taken in column E. In column E, you should select “No” if an employee did not take a lunch break. These are the necessary entries and selections within the timesheet.
Other editable columns are I to K, which allow you to specify if the employee has taken sick leave, is on vacation or has another status. These entries won’t affect the calculations.
To use this free timesheet template, you must understand the calculations controlled by the control panel. Let’s review the necessary settings.
Employee Timesheet Control Panel Settings
Understanding the control panel settings is essential not only for managing regular working hours and overtime calculations but also for populating the dates.
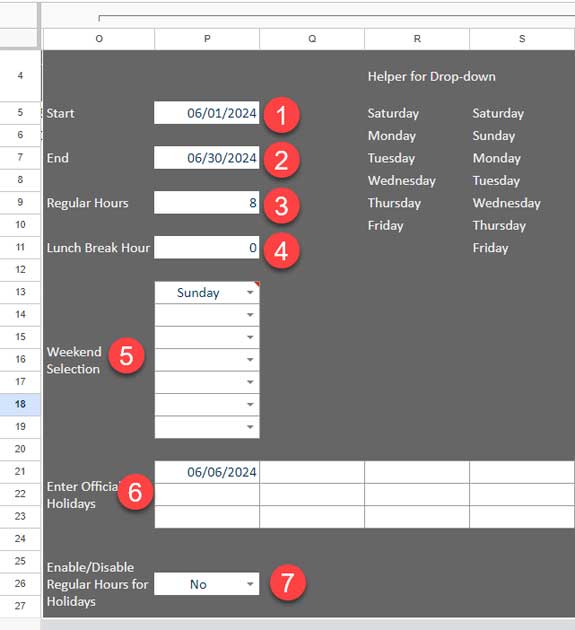
There are seven settings, and here they are (refer to the image above):
- Start Date: Enter the start date in cell P5 to begin the date sequence in column B.
- End Date: Specify the end date in cell P7 to conclude the date sequence.
- Regular Working Hours: Define the standard regular working hours for your organization in cell P9.
- Lunch Break Duration: Enter the lunch break duration in cell P11 (e.g., 0.5 for 30 minutes, 1 for 1 hour).
- Weekends: Select weekends from drop-down menus in cells P13:P19.
Choose Saturday and Sunday as weekends by selecting Saturday in P13 and Sunday in P14, represented by “W” in column H of the timesheet. - Holidays: Enter holidays (other than weekends) in cells P21:T23. These will appear in column H of the timesheet and be represented by “H”.
- Overtime Calculation: Use the drop-down menu in cell P26. Select ‘Yes’ if you want to count regular hours as overtime on weekends/holidays.
Conclusion
To ensure reliability, I have implemented several data validation settings in the control panel of this free automated timesheet template.
It includes a date picker for specifying dates in the control panel, particularly in the start date, end date, and holiday cells. You can double-click to select a date.
Additionally, it prevents accidental selection of the same day multiple times in the weekend’s selection range.
To view all data validation settings, navigate to cell P5 and click on Data > Data validation.
I have used array formulas to automate this timesheet. You can find these formulas in cells B5, F5, G5, H5, and L5. Please do not delete them.
Resources
Looking to create your own timesheet? These guides will lend you a helping hand: