Unlock the potential of seamless presentations with our guide to mastering Auto-Cycle, Auto-Advance, and Transition Timing in Google Slides.
One key advantage of Google Slides is its accessibility—no need to download presentation graphic software; simply open it in your browser. It provides a user-friendly solution for creating impactful presentations, with the added flexibility of converting slides to the .pptx format for offline programs like PowerPoint.
In the past, Google Slides lacked the option to auto-cycle and auto-advance slides without publishing. Fortunately, these features are now available, allowing for a smooth auto-cycle, auto-advance, and the setting of specific time intervals between slides.
For personalized timing between slides, explore options such as adding transitions, adjusting timings, or duplicating slides.
In summary:
- Auto-Cycle: Allows your presentation to loop continuously.
- Auto-Advance: Automatically transitions to the next slide after a specified time.
- Transition Timing: Controls the duration of each slide transition.
- Duplicating a Specific Slide: Creates the effect of a different time in auto-advance.
Join us as we break down these steps in a simple, step-by-step guide.
Auto-Cycle and Auto-Advance in Google Slides Presentations (No Publishing Required)
It can be a bit tricky to locate the option to play, automatically advance, and loop slides in Google Slides. Here are step-by-step instructions:

- Create a new Google Slides presentation here or open your existing presentation here.
- Once you are ready to play the presentation, click on View > Slideshow.
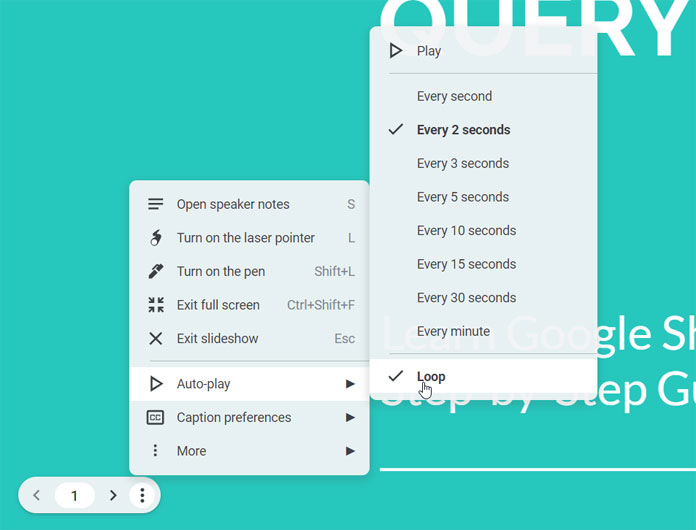
- Move your cursor pointer to the bottom left corner of the screen to access a floating-type menubar (please refer to the image above).
- Click on the vertical three-dot menu (kebab menu) and select Auto-play.
- To enable auto-cycle slide transition, click on Loop to check it. Then, choose the slide advance time you desire, such as every second or every 2 seconds.
- Click the play button.
This way, you can auto-cycle and auto-advance a presentation in Google Slides.
Enhancing Slide Transition Timing in Google Slides
When you auto-cycle and auto-advance your presentation, you might sometimes want viewers to focus on a particular slide at every loop’s beginning or end.
In that case, you can follow this approach:
- In the first approach, right-click on the last or first slide and select “Duplicate slide.”
- Create one or more duplicates of this slide.
- When you loop and auto-advance, there will be extra time from this duplicated slide to the next one.
Another option is to set transition timing for the first slide.
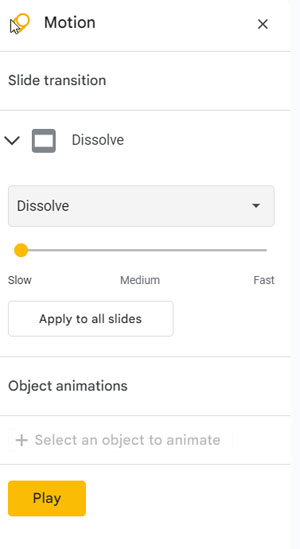
- Select the first slide and click on Slide > Transition.
- On the sidebar panel, choose the “Dissolve” slide transition and set the speed to slow.

Use these settings when you aim to manage the slide transition timing, controlling the advancement from one slide to another, especially when emphasizing specific slides.
Personally, I employ this technique to draw more user attention to charts imported from Google Sheets into slides.
Looping and Auto-Advancing Slides in Google Slides through Web Publishing
Previously, auto-cycling (looping) and auto-advancing slides were exclusive to web-published presentations. It remains a viable and excellent option when you aim to share your presentation with a large audience.
To do this, follow these steps:
- Click on File > Share > Publish to the web.
- Choose whether you want the URL to be shared or get the code to embed on your blog.
- Set the “Auto-advance slides” time and check “Restart the slideshow after the last slide” to loop the slide.
- Click Publish.
To unpublish, click File > Share > Publish to the web, and then click on “Stop publishing.”
On a published document, the user can play the presentation by clicking on the vertical three-dot menu and selecting Auto-play > Play. To access the menu, they need to move the mouse pointer over the left corner of the slide.


Thanks for this really simple and obvious life hack lol. Can’t believe there’s no built in way to change transition timing
Hi, Mikhail,
I have posted this 2-3 years back. After that, I have switched my concentration on the topic related to Google Sheets. So I am unsure about the current developments.
Best,