")
")


")


")

")
")
 in Excel & Google Sheets")


The ‘novel’ idea of a formula-based mail merge in Google Sheets came to my mind quite recently. I was actually trying to repeat rows — or you could say duplicate rows — that contained some content.
I successfully achieved that. You can read about that experiment in your spare time here: How to Insert Duplicate Rows in Google Sheets.
While working on duplicating rows, I thought of taking it a step further — replacing some of the content in each duplicated row.
I worked on that idea, and the result is this Sheets formula-based mail merge. It’s an experiment, and I hope some of you will find it useful.
What Is Mail Merge?
Mail merge is the process of automatically adding names, addresses, or other personalized details from a database into letters, envelopes, or emails.
In simple terms, it’s about generating multiple copies of the same letter or document — each personalized with the recipient’s information.
Mail merging can save a lot of valuable time if you need to send letters with the same core content to multiple recipients.
While Google Sheets does not have a built-in mail merge option (understandably, since it’s a spreadsheet application, not a word processor), with the help of my formulas, you can perform a limited but effective mail merge in Google Sheets.
Let me introduce you to my Sheet (template) and the formulas in use. There are four tabs (the link to the sample sheet is given later in this article).
Google Sheets Tabs for Mail Merging Letters

1. Letter Tab – Draft Letter for Mail Merge in Google Sheets
[User is permitted to edit this tab]
This tab contains the draft letter.
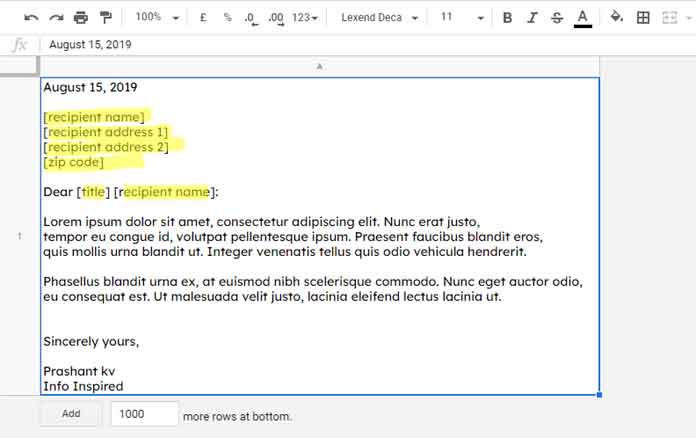
You’ll see some placeholders (highlighted in yellow) that the mail merge process replaces with recipient-specific details.
You are free to rearrange the placeholders or move them around the letter as needed. Also, feel free to replace the sample “Lorem ipsum…” text with your own content. There are no restrictions on adding more paragraphs.
I have included five placeholders (details follow) in my formula-based mail merge in Google Sheets, and each placeholder can be used multiple times throughout the letter.
Important: You must type the entire letter within a single cell, using line breaks. See: Start New Lines Within a Cell in Google Sheets – Desktop and Mobile.
2. Address Tab – Contains Recipient Names and Their Addresses
[User is permitted to edit this tab]
The five placeholders I have used in the draft letter are:
- [recipient name]
- [recipient address 1]
- [recipient address 2]
- [zip code]
- [title]
These placeholders match the field labels (row headers) in the address dataset located in the ‘Address’ tab.
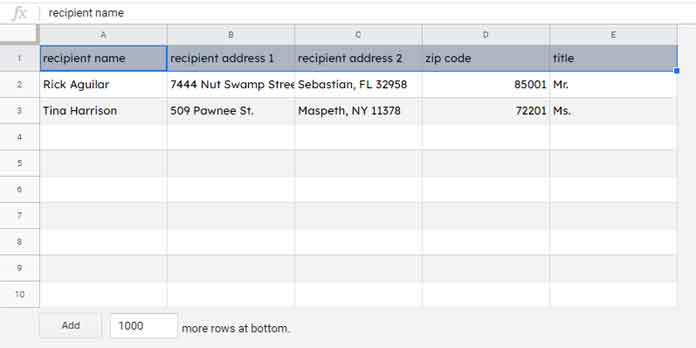
The sample address book currently contains two recipient records, so the mail merge will generate two letters with different addresses.
Of course, you can add more records (recipient details) to this ‘Address’ tab as needed — I’ll explain how later.
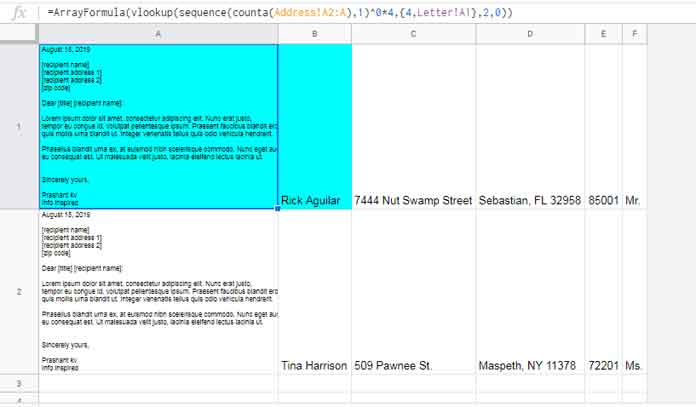
3. Formulas Tab
[User interaction not required in this tab]
This tab holds two key formulas:
Formula in Cell A1:
=ArrayFormula(VLOOKUP(SEQUENCE(COUNTA(Address!A2:A), 1, 1, 0), {1, Letter!A1}, 2, 0))This formula creates duplicate copies of the letter from the ‘Letter’ tab, matching the number of records in the ‘Address’ tab.
I’m not diving into a detailed formula explanation here, as my goal is to show you how to mail merge in Google Sheets using formulas.
Formula in Cell B1:
=ArrayFormula(Address!A2:E)This simply brings the recipient records from the ‘Address’ tab into the ‘Formulas’ tab.
4. Mail Merge Output Tab – Merged Letters
[User interaction not required in this tab]
This final tab contains the completed, mail-merged letters. In each letter, the placeholders are replaced with the correct recipient information from the ‘Address’ tab.
Formula in Cell A1 for Mail Merge in Google Sheets:
=ArrayFormula(SUBSTITUTE(SUBSTITUTE(SUBSTITUTE(SUBSTITUTE(SUBSTITUTE(Formulas!A1:A, "[recipient name]", Formulas!B1:B), "[recipient address 1]", Formulas!C1:C), "[recipient address 2]", Formulas!D1:D), "[zip code]", Formulas!E1:E), "[title]", Formulas!F1:F))This formula handles the replacement of all placeholders to personalize each letter.
Template
How to Use My Template to Mail Merge Letters in Google Sheets
You only need to follow two simple steps:
- Modify the letter in the ‘Letter’ tab. Only use the five placeholders listed above.
- Add your recipients’ information in the ‘Address’ tab.
If you add five recipient records in the ‘Address’ tab, the formulas will automatically mail merge five personalized letters into the ‘Mail Merge Output’ tab.
You can then copy the merged letters into Google Docs, Microsoft Word, or any other word processor. Alternatively, you can convert the sheet directly to a PDF from within Google Sheets. Just remember to insert page breaks between each letter.
Been reading your blog weekly for quite a while and you “change my life” about once every other month!
I’m head over IT and reporting for a large grass-roots African NGO in 24 countries. We have little money, so we leverage Google Sheets in astounding ways…and even more so, thanks to you!
One that really changed my life was the “matches” with regex within a G-Sheet Query, wow that has simplified some of the multitudes of my queries.
Thanks, James for your feedback. I get inspiration from such comments.