
Missing your visa renewal, vehicle insurance renewal, emission certificate expiry, domain renewal, or scheduled vehicle service can lead to unnecessary stress, penalties, or service interruptions. This free Google Sheets Document Expiry Tracker helps you keep all your important expiry and renewal dates in one place with visual expiry alerts and an interactive dashboard.
Although designed for tracking document expiries, the template is flexible enough to manage anything with an expiry, renewal, or scheduled due date. Use it to track website domains, web hosting, SSL certificates, software licenses, maintenance contracts, memberships, business registrations, and more.
📥 Click the button below to make your own copy of the free template.
(The template will be copied to your Google Drive.)
What’s Inside the Template?
The Document Expiry Tracker Template includes three visible sheets and one hidden helper sheet:
- Expiry Tracker – Enter and manage your document and renewal details.
- Dashboard – Monitor upcoming renewals with KPI cards, charts, and summary tables.
- Lists – Contains the lists used for the drop-down menus in the Expiry Tracker sheet.
- Helper (hidden) – Stores supporting formulas and calculations used by the Dashboard.

1. Expiry Tracker Sheet – Log Your Document Expiries
The Expiry Tracker is the main data-entry sheet where you record all your personal and business documents, as well as other items with expiry or renewal dates.
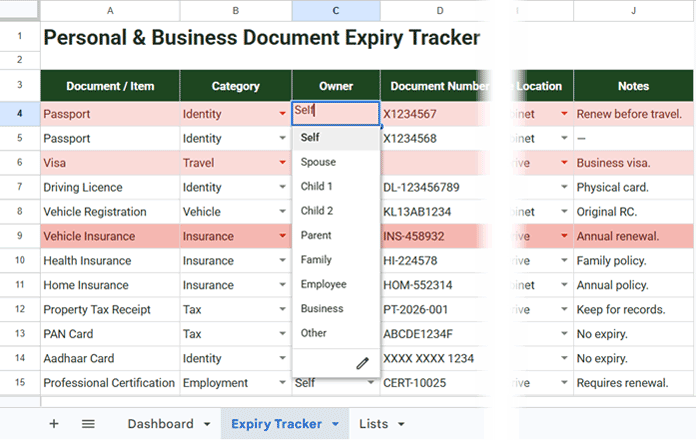
The following fields help you organize your records efficiently.
Field Descriptions
Most of the fields are self-explanatory, but here’s a brief explanation of each one.
Document / Item
Enter the name of the document or item, such as a passport, driver’s license, post box, domain name, SSL certificate, insurance policy, or any other item with an expiry or renewal date.
Category
Select a category for the document from the drop-down list. You can customize the available categories in the Lists sheet (Column B).
Owner
Select the owner of the document from the drop-down list. For example, you might use Self, Family, Business, Child, or any other owner that suits your needs. You can customize the list in the Lists sheet (Column F).
Document Number
Optional. Enter the document’s reference or identification number, such as a passport number, driver’s license number, fixed deposit receipt number, policy number, or registration number.
Issue Date
Enter the original issue date. When the document is renewed or reissued, update this field with the issue date of the current document.
Expiry Date
Enter the document’s expiry date. When the document is renewed, update this field with the new expiry date. If an item doesn’t have an expiry date, you can either leave this field blank or omit the record entirely. I prefer keeping permanent documents in the tracker for completeness, even though they don’t have an expiry date.
Alert (Days Prior)
Select how many days in advance you want to be alerted before the expiry date. Some items are best renewed well before they expire to allow enough time for processing, payment issues, or other unexpected delays. You can choose an appropriate reminder period for each item. The available reminder periods are controlled from the Lists sheet (Column D). When the selected reminder period is reached, the row is automatically highlighted.
Days Left
This column is calculated automatically using an array formula that displays the number of days remaining until expiry. No manual entry is required.
Storage Location
Select where the document is stored, such as a filing cabinet, safe, cloud storage, or email. The drop-down values can be customized in the Lists sheet (Column H).
Notes
Optional. Use this field to record any additional information related to the document or renewal.
2. Lists Sheet – Customize the Drop-Down Lists
The Lists sheet is where you manage the values used in the drop-down menus throughout the Expiry Tracker sheet.
As explained in the previous section, you can customize document categories, owners, alert periods, and storage locations by editing the corresponding lists in this sheet. Simply add, remove, or modify the entries to suit your requirements.
3. Dashboard Sheet – Track Upcoming Expiries
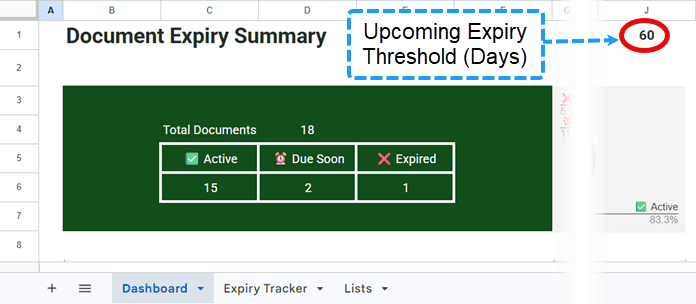
The Dashboard provides an interactive overview of your document expiry records through KPI cards, charts, and summary tables.
Key Components
KPI Cards
The KPI cards display key information about your tracked documents:
- Total Documents – Total number of records in the tracker.
- Active – Documents that are not yet due for renewal.
- Due Soon – Documents that fall within the reminder threshold.
- Expired – Documents whose expiry date has already passed.
The Upcoming Threshold (Days) value in cell J1 controls when a document is considered Due Soon.
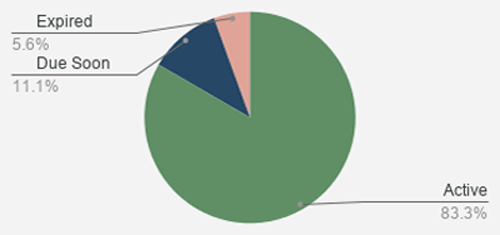
Doughnut Chart
The doughnut chart provides a visual breakdown of the KPI values, making it easy to see the overall status of your tracked documents at a glance.
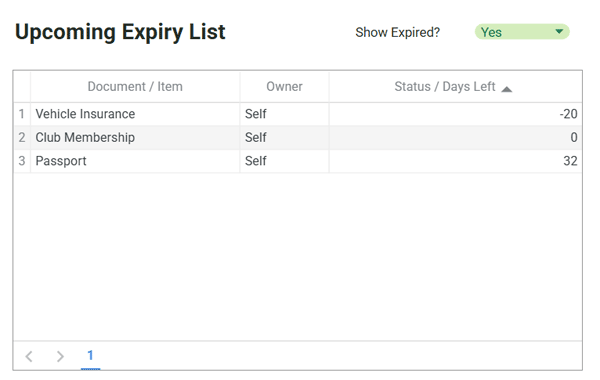
Upcoming Expiry Table
This table lists documents that are approaching their expiry date based on the threshold value in cell J1. It displays the Document / Item, Owner, and Days Left.
The table shows up to 10 records per page. If more records are available, use the pagination controls at the bottom of the table to view additional entries.
You can also choose whether to include already expired items by using the Show Expired Yes/No drop-down.
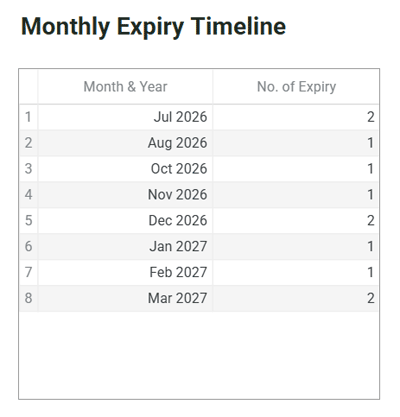
Monthly Expiry Timeline
This table summarizes the number of documents due to expire each month. It displays up to the next 12 months, including the current month, depending on the available data.
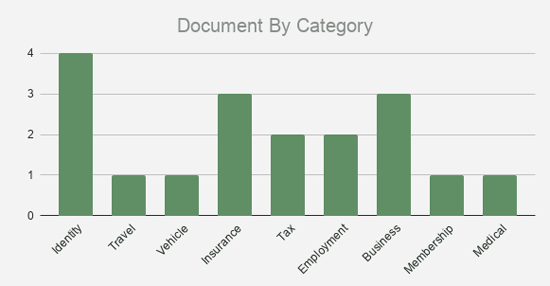
Documents by Category Chart
The column chart shows how your tracked documents are distributed across categories, helping you understand which categories contain the most records.
4. Helper Sheet (No User Input Required)
The Helper sheet is hidden by default. It contains two QUERY formulas that generate the data used by the two summary tables on the Dashboard sheet.
In normal use, you can ignore this sheet completely.
If you’d like to view it, click the All Sheets button at the bottom-left of the workbook. The Helper sheet appears grayed out in the sheet list. Simply click it to open the sheet.
How to Use This Free Google Sheets Document Expiry Tracker Template
Getting started takes only a few minutes.
Step 1: Customize the Drop-Down Lists
Open the Lists sheet and update the values used in the drop-down menus.
The template uses four customizable lists:
- Category
- Alert (Days Prior)
- Owner
- Storage Location
You can replace the sample values with your own. Do not delete any rows. Instead, select the existing entries (for example, B3:B, D3:D, F3:F, and H3:H) and press Delete to clear the contents before entering your own values.
Step 2: Clear the Sample Data
Go to the Expiry Tracker sheet.
If you want to start with a blank tracker, select the range A4:J and press Delete. This removes only the sample data while preserving all formulas, conditional formatting, and data validation.
Step 3: Enter Your Records
Enter your document or renewal details in each row.
For columns that contain drop-down menus, select a value from the list instead of typing it manually.
Avoid copying and pasting data directly into the tracker, as this may overwrite the conditional formatting used for expiry alerts. If you need to paste data, use Edit > Paste special > Values only. Please note that this option is not available in the Google Sheets mobile app.
The Days Left column is calculated automatically using an array formula in the header row, so you don’t need to enter anything in that column.
Step 4: Review Expiry Alerts
As you add records, the tracker automatically highlights:
- Expired documents.
- Documents due for renewal, based on the Alert (Days Prior) value selected for each record.
Step 5: View the Dashboard
Open the Dashboard sheet and enter your preferred Upcoming Threshold (Days) value in cell J1.
The KPI cards, charts, and summary tables update automatically, giving you an instant overview of your tracked items.
Note: The Upcoming Threshold (Days) on the Dashboard is used only for reporting. It determines which records are counted as Due Soon in the KPI cards, the Doughnut Chart, and the Upcoming Expiry table. It does not control the row highlighting in the Expiry Tracker sheet, which is based on the Alert (Days Prior) value set individually for each record. This lets you use different reminder periods for different documents while maintaining a separate dashboard threshold.
FAQ
Does the template send email reminders?
No. The Document Expiry Tracker provides visual alerts by highlighting upcoming expiries in the Expiry Tracker sheet and summarizing them on the Dashboard. If you need email notifications, you can extend the template using Google Apps Script.
What happens after I renew a document?
Simply update the Issue Date and the Expiry Date in the Expiry Tracker sheet. The Dashboard, charts, and alerts update automatically.
Final Thoughts
That’s all there is to it. Once you’ve entered your records, the tracker automatically monitors upcoming expiries and updates the dashboard for you.
If you have any questions or suggestions, leave a comment below and I’ll be happy to help.
Browse my collection of free Google Sheets templates, including premium-quality, fully automated spreadsheet solutions.