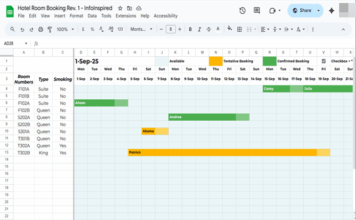

A drop-down list (or drop-down menu) in Google Sheets lets users select one or more predefined values instead of typing them manually. As one of Google Sheets’ data validation features, it improves data accuracy, speeds up data entry, and keeps spreadsheets consistent.
Google Sheets lets you create a drop-down list in three ways, depending on where the list items come from:
| Method | Source of Items | Best For |
|---|---|---|
| Drop-down | Entered manually | Small fixed lists |
| Drop-down (from a range) | Cell range | Lists that change over time |
| Preset drop-down | Google’s preset lists | Common project and status values |
All three methods create single-selection drop-downs by default. For manually created drop-downs and drop-downs created from a range, you can enable Allow multiple selections so users can select more than one item from the same drop-down.
You can convert an existing single-selection drop-down to a multiple-selection drop-down at any time by editing its data validation rule.
In this guide, you’ll learn how to create each type of drop-down list, customize its appearance and behavior, and explore the available settings.
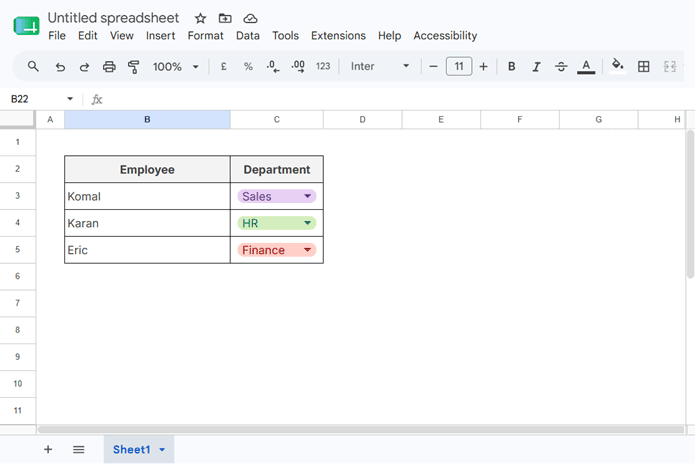
Create a Drop-Down List by Adding Menu Items Manually
If your drop-down list contains only a few fixed values that rarely change, entering the items manually is the simplest approach.
Select the cell (or cell range) where you want to insert the drop-down. In this example, we’ll create it in cell C2.
- Select cell C2.
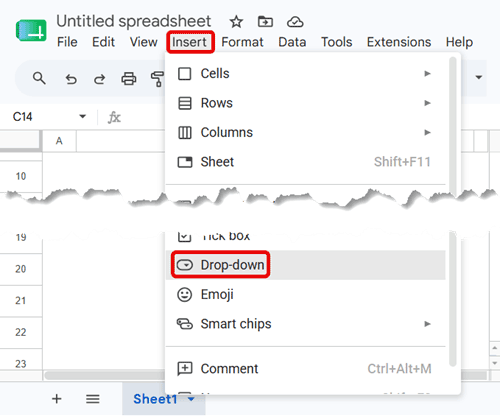
- Click Insert > Drop-down or Data > Data validation > Add rule.
- Under Criteria, select Drop-down.
- You’ll see two placeholder items. Replace them with the values you want to appear in the list (for example, Ben and Jay).
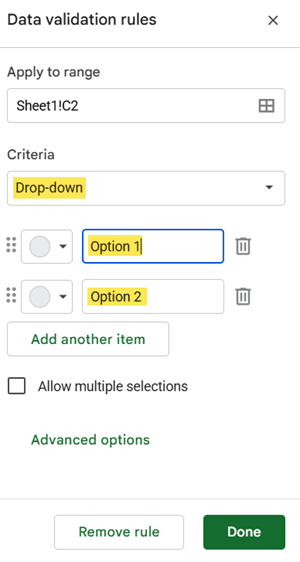
- Optionally, assign a different color to each item.
- Click Add another item to add more values, or click the Delete (trash/bin) icon to remove an item.
- Click Done to save the drop-down.
Tip: If you’ve already entered the list items in worksheet cells, select the range and choose Insert > Drop-down. Google Sheets converts the selected cells into drop-downs, using the selected values as the list items while preserving each cell’s current value.
Customize the Drop-Down
Allow Multiple Selections
Enable Allow multiple selections if you want users to select more than one value in the same cell.
Advanced Options
Click Advanced options to control what happens when someone enters a value that isn’t in the drop-down list.
- Show a warning: Allows the entry but displays a red triangle in the cell to indicate that the value doesn’t match the drop-down list.
- Reject the input: Prevents invalid entries. You can also add Help text to guide users when they select the cell.
Display Style
You can choose one of the following display styles:
| Style | Description |
|---|---|
| Chip | Displays the selected value as a colored chip. |
| Arrow | Displays only a drop-down arrow in the cell. |
| Plain text | Displays the selected value as plain text. Double-click the cell to open the list. |
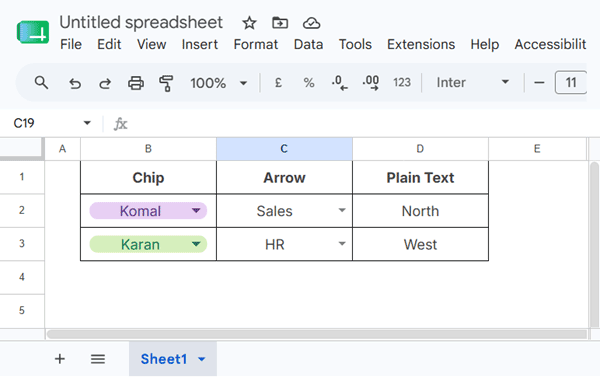
Regardless of the display style, you can also open the drop-down by selecting the cell and pressing the Spacebar.
Note: When Allow multiple selections is enabled, Chip is the only available display style.
Create a Drop-Down List from a Range
Instead of entering the menu items manually, you can create a drop-down list that references values in a cell range. This is the best option if the source list may change over time.
For example, enter the names Ben, Johanna, and Jay in cells F1, F2, and F3, respectively.
Follow the same steps as in the previous method, except for Step 3:
- Under Criteria, select Drop-down (from a range).
- In the Select data range field, enter F1:F3 or select the range directly from the sheet.
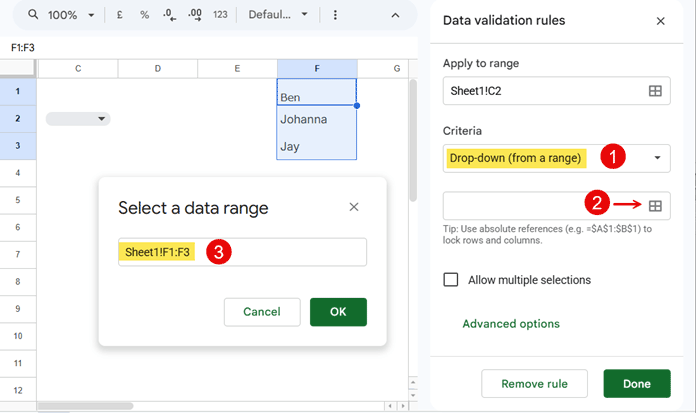
If you expect to add more names later, specify a larger range, such as F1:F10, instead of F1:F3. Any future values entered within that range will automatically appear in the drop-down list.
All other settings are the same as those described in the previous method.
Note: When you create a drop-down from a range, Google Sheets automatically ignores blank cells and duplicate values in the source range. Only unique, non-empty values appear in the drop-down list.
Use Named Ranges and Table References
You can also use named ranges and table references instead of standard cell ranges.
For example:
If the data is in a table named Table1 and the column is employee, enter =Table1[employee].
If F1:F3 is a named range called employees, enter =employees.
Insert a Preset Drop-Down Using the @ Menu
Preset drop-downs are ideal when Google’s predefined lists match your workflow, since you don’t have to enter the values manually.
Google Sheets includes several preset drop-down lists that you can insert quickly using the @ menu. Unlike the other two methods, preset drop-downs come with predefined values that you can edit later if needed.
- Select the cell where you want to insert the drop-down.
- Type
@to open the@menu. - Scroll to Drop-down and click it.
- Choose one of the available preset drop-downs.
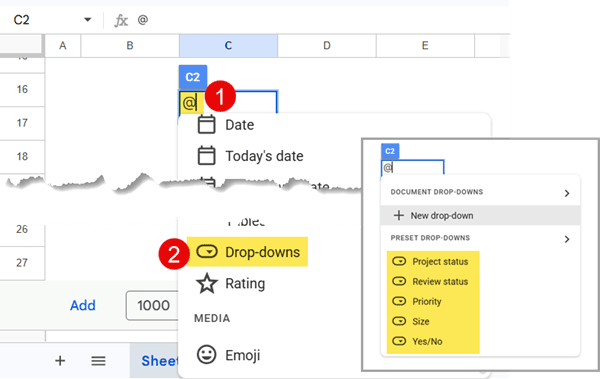
For example, selecting Project status inserts a drop-down with predefined options such as Not started, Blocked, In progress, and Completed.
Edit an Existing Drop-Down
You can edit an existing drop-down in any of these ways:
- Open the drop-down menu in the cell and click the Edit (pencil) icon at the bottom.
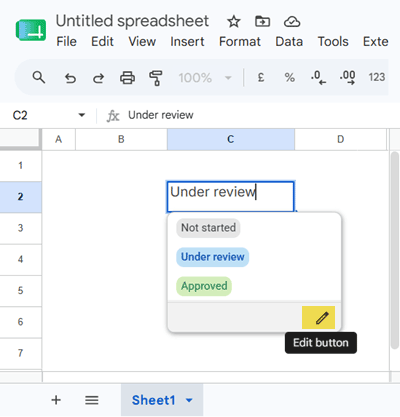
- Select the drop-down cell, then click Insert > Drop-down.
- To view and manage all drop-down rules in the current sheet, click the Select All button (the blank square at the intersection of the row numbers and column letters), then choose Data > Data validation.
Note: If multiple drop-downs share the same data validation rule, Google Sheets displays the following prompt when you edit one of them:
Apply to all?
There are 1 other drop-downs with the same properties. Do you want to make changes to all of them?
Choose Yes to apply the changes to every drop-down that uses the same rule, or No to update only the selected drop-down.
Quick Tip: To remove a drop-down, select the cell and press Delete twice. The first press clears the selected value, and the second removes the drop-down rule while preserving the cell’s formatting.
Conclusion
In this tutorial, you learned how to create drop-down lists in Google Sheets using manual entries, a cell range, and preset lists. You also learned how to customize their appearance, control user input, and enable multiple selections where supported.
Although drop-down lists are part of Google Sheets’ data validation feature, they’re useful for much more than validating input. They can also power interactive spreadsheets by serving as criteria in functions such as FILTER, QUERY, and XLOOKUP.
Ready to do more with data validation? Explore The Complete Guide to Data Validation in Google Sheets, where you’ll learn advanced drop-down techniques, checkboxes, custom validation rules, and practical examples.