Create personalized online forms for free with Google Forms. This tutorial explains all about setting up a Google form from scratch.
Before we go into that, here are the main advantages of using Google Forms:
- It’s user-friendly.
- It offers ready-to-use templates.
- It’s free to use.
- It allows for collaboration with others so that multiple people can work on the same form at the same time.
- It’s mobile-friendly.
- It supports a variety of question types (which we will discuss in detail).
- It has Google Sheets connectivity.
You can use Google Forms for many purposes, including:
- Creating surveys.
- Collecting event registrations.
- Conducting quizzes and exams.
- Gathering feedback.
- Collecting data for research.
Let’s see how to set up a Google Forms form, learn about the supported question types, and add them.
I am explaining to you each step involved in setting up a visually appealing Google Forms form.
How to Create Your First Google Forms Form
To create your first Google Forms form, go to this URL: https://form.new/
This will open an untitled form. You need to name it and add questions to it before using it.
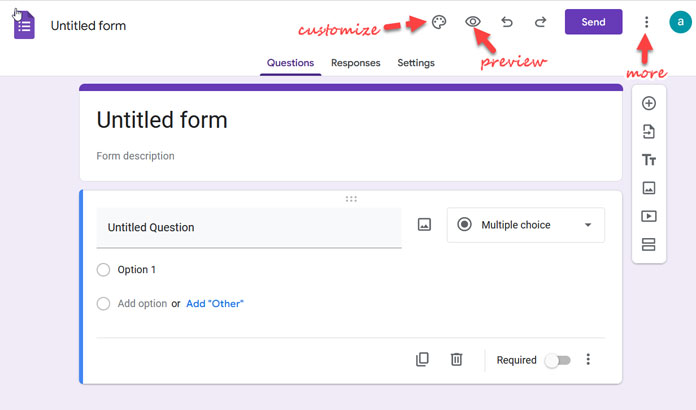
Here is the home view of a blank Google Forms form:
1. Naming a New Google Forms Form
How do I name a new Google Forms form and file?
The file name and Google Forms form name are different.
Please refer to the image above. In the top left corner, you can type the name of your file by replacing “Untitled form.” Then within the form, replace “Untitled form” with your form name and add a description below.
I am naming the file “InfoInspired” and naming the form “Test Form”. The description is “This form is just for experimental purposes.”
2. Connecting a Google Forms Form to a Google Sheets File
To store form responses in Google Sheets, connect a Google Sheets file to your form. This will let you analyze your data in a spreadsheet, where Google Sheets’ incredible data manipulation capabilities can help you.
Even if you’re not familiar with Google Sheets, I recommend connecting your Google Forms form to a Google Sheets file, because you can use Sheets’ built-in filters, slicers, pivot tables, charts, and more with minimal effort.
How to connect a Google Forms form to a Google Sheets file:
- Open the Google Forms form that you want to connect to a Google Sheets file.
- Click the “Responses” tab.
- Click the three dots button in the top right corner or the “Link to Sheets” link.
- Select “Select destination for responses.”
- Select “Create a new spreadsheet” or “Select existing spreadsheet.”
- Click Create or Select.
How to unlink a Google Sheets file from a Google Forms form:
- Open the Google Forms form.
- Click the “Responses” tab.
- Click the three dots button in the top right corner.
- Select “Unlink form.”
3. Adding Questions to a New Google Forms Form
Click the Questions tab to create different question types, the soul of a Google Forms form. I’ll introduce you to each question type so you can understand how to create your first Google Forms form with a professional touch.
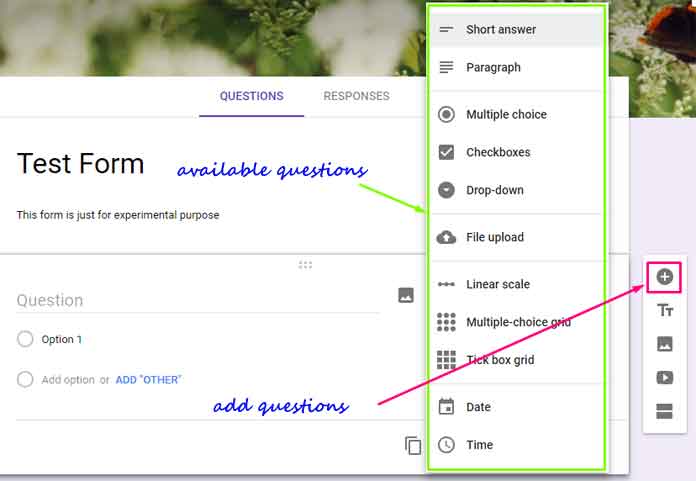
Your blank form already has a default question. Click on it to open a drop-down menu with the available question types. Select one. To add a new question, click the + button and select the type from the drop-down menu.
Short Answer Question Type
What is the purpose of the Short answer question type?
Short-answer questions are meant to collect short answers. For example, you can use them to ask questions like:
- What is your age?
- How long have you been in London?
- What is your favorite player?
- How long have you been using our product?
You can also post an image and ask questions like “Can you identify the plant in this image?” when conducting quizzes and exams.
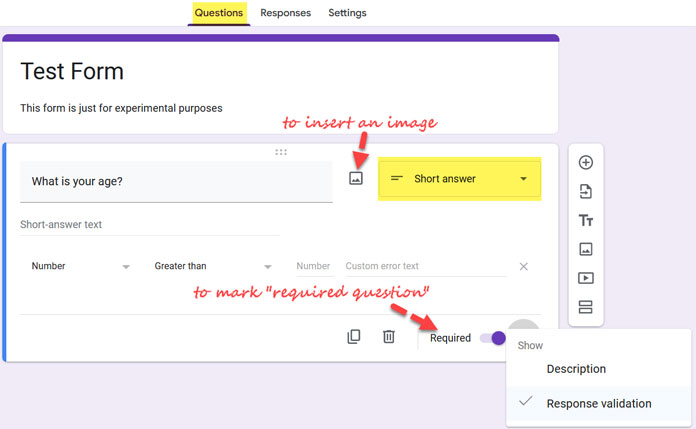
At the bottom of the question, you can see a Required toggle button, which is available in all question types. If you enable it, the question will be marked as required on the submission form.
If you click the three vertical dots, you will see additional options to add a description below the question and enable response validation.
It’s important to choose the correct question type when creating your Google Forms form to gather accurate answers or information.
Paragraph Question Type
This is similar to the Short Answer question type, but the answer field wraps when a responder types long answers. Use this form when you expect long answers.
For example, you can ask questions like:
- Write your short bio.
Checkboxes
The Checkboxes question type in a Google Forms form allows you to create multiple-choice questions where the respondent can select one or more answers.
To limit multiple-choice questions to have a single correct answer, enable Response validation by clicking the three vertical dots at the bottom of the question.
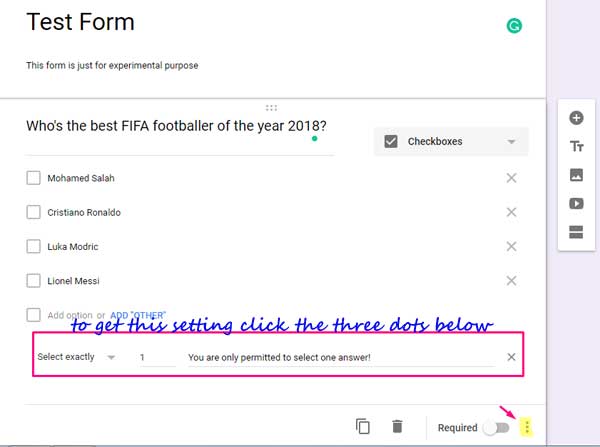
To get a single correct answer, select “Select exactly” from the drop-down menu and type 1 in the next field. You can optionally add an error message to appear when the respondent tries to select more than one checkbox.

Drop-down Question
The Drop-down question in Google Forms helps respondents answer a question by clicking the drop-down menu and selecting an answer. It’s similar to the Checkboxes question type, but the respondent can only select one answer.
Here, you have an additional option: the “Go to section based on answer” feature. This feature allows you to send respondents to different sections of your form based on their answers. This is a useful feature for creating surveys and forms that are more personalized and relevant to each respondent. We will discuss this in a later part of this tutorial.
Multiple Choice Question
The Multiple Choice question type is similar to Checkboxes, but the main difference is that it allows respondents to choose only one answer, while Checkboxes questions allow respondents to choose one or more answers.
You can enable “Go to section based on answer” on Multiple Choice questions, but not on Checkboxes questions.
If you are particular about choosing between the two question types, you can decide based on their purpose:
- Multiple Choice: Collecting opinions, feedback, or data about people’s preferences.
- Checkboxes: Collecting data about people’s demographics, interests, or behaviors.
File Upload Question
This setting allows respondents to upload a file to your Google Drive. You can set the number of files allowed to upload, the file type, and the file size.
The respondent will see an “Add File” upload button to click and upload a file that meets the type and size you set.
The connected Google Sheets will record the timestamp and the link of the uploaded file.
One example of using the File upload question type is to collect an applicant’s passport-size photo, ID proof, etc., as part of an application.
Use the File upload question type in forms that you share with people you know and trust, as it can be misused.
Linear Scale Question Type
What is the purpose of the Linear scale question type in Google Forms?
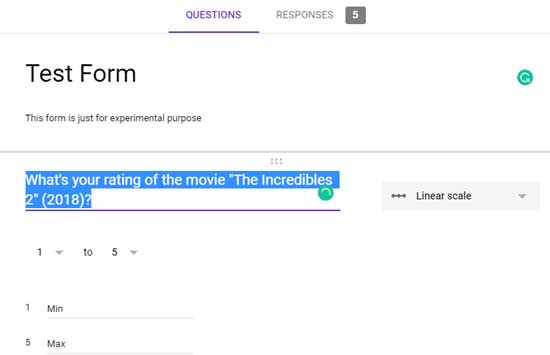
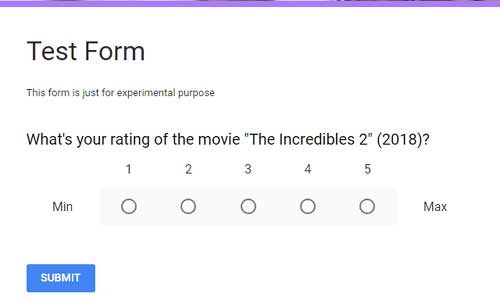
To create a scale with numbers from 0 to 10 or 1 to 10, with custom labels at the start and end of the scale.
You can use it to ask questions like:
- What rating would you give the movie “The Incredibles 2” (2018) on a scale of 1 to 5?
- How satisfied are you with our product?
- How likely are you to recommend our company to a friend?
Here is the preview of the Linear Scale:
Multiple-Choice Grid Question
What is the purpose of Multiple-choice grid questions in Google Forms?
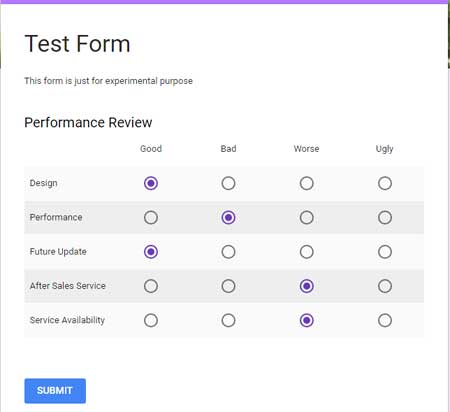
The purpose of a Multiple-choice grid question in Google Forms is to allow respondents to select one answer per row from a list of predetermined choices.
This type of question is useful for collecting data on a variety of topics, such as:
- Product satisfaction
- Customer preferences
- Employee feedback
- Deployed feedback
Multiple-Choice Grid Example Preview:
Multiple-Choice Grid Edit Preview:
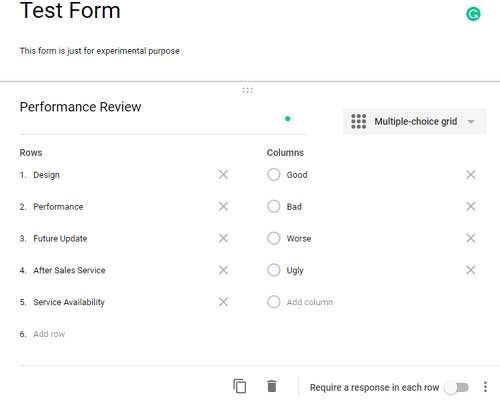
You can enable or disable the “Require a response in each row” setting in Multiple-choice grid questions in Google Forms. I prefer to enable it.
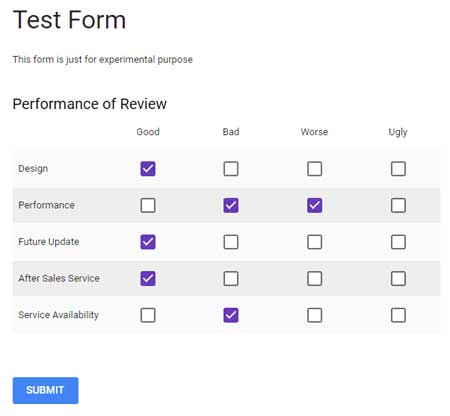
Tick Box Grid Question Type
I don’t find much difference between the Tick box grid (Checkbox grid) and the Multiple-choice grid. Both can be created in the same way.
The key difference between a Checkbox grid and a Multiple-choice grid is that the former supports only one answer per question, while the latter supports multiple answers per question.
Therefore, in a connected Google Sheets spreadsheet, multiple answers in a Checkbox grid question will appear as comma-separated values in a cell.
Tick Box Grid Form View:
You have already learned the important parts of setting up Google Docs Forms. There are two more question types. They are time and date.
Date Question Type
You can use the Date question in a Google Forms form to add a date field to the form. For example, you can ask a respondent to enter their date of birth (DOB).
You can give options for day and month, day, month, and year, and optionally a time field.
Time Question Type
The Time question type in a Google Forms form is used to collect time or duration data. For example, you can use it to track employee attendance or to collect data on the time it takes to complete a task.
3. How to Add a Question Between Existing Questions in Google Forms
To insert a question between two existing questions:
- Click on the question below which you want to insert the new question.
- Click the + button.
If you want to delete a question, click the Delete button on the question. To move the position of a question, drag and drop the question to the desired location.
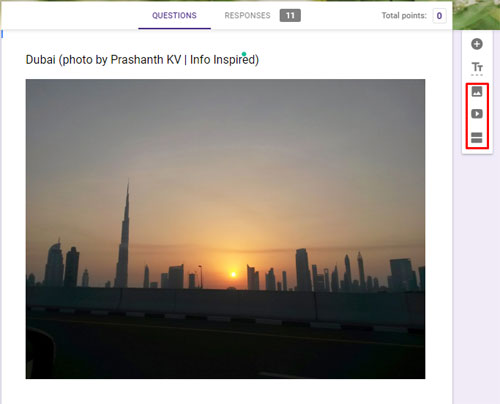
4. Inserting Video and Image Inside a Google Docs Form
Similar to adding questions, you can add informative videos and images to your Google Form.
You can see the relevant icons below the + button in your Google Forms form.
5. What is the Purpose of Adding Sections?
Let’s put the finishing touches on your Google Forms form.
Other than images and videos, there is also an option called “Add sections.” This allows you to split your form into different sections.
This can be useful for a variety of reasons, such as:
- To make your form easier to read and complete.
- To group related questions together.
- To create a logical flow for your form.
- To use conditional logic to show or hide questions based on previous answers in Multiple-Choice and Drop-down question types.
You can insert a section at the point you want similar to inserting questions.
- Click on the question below which you want to insert a question.
- Click the section button below the + button.
Example
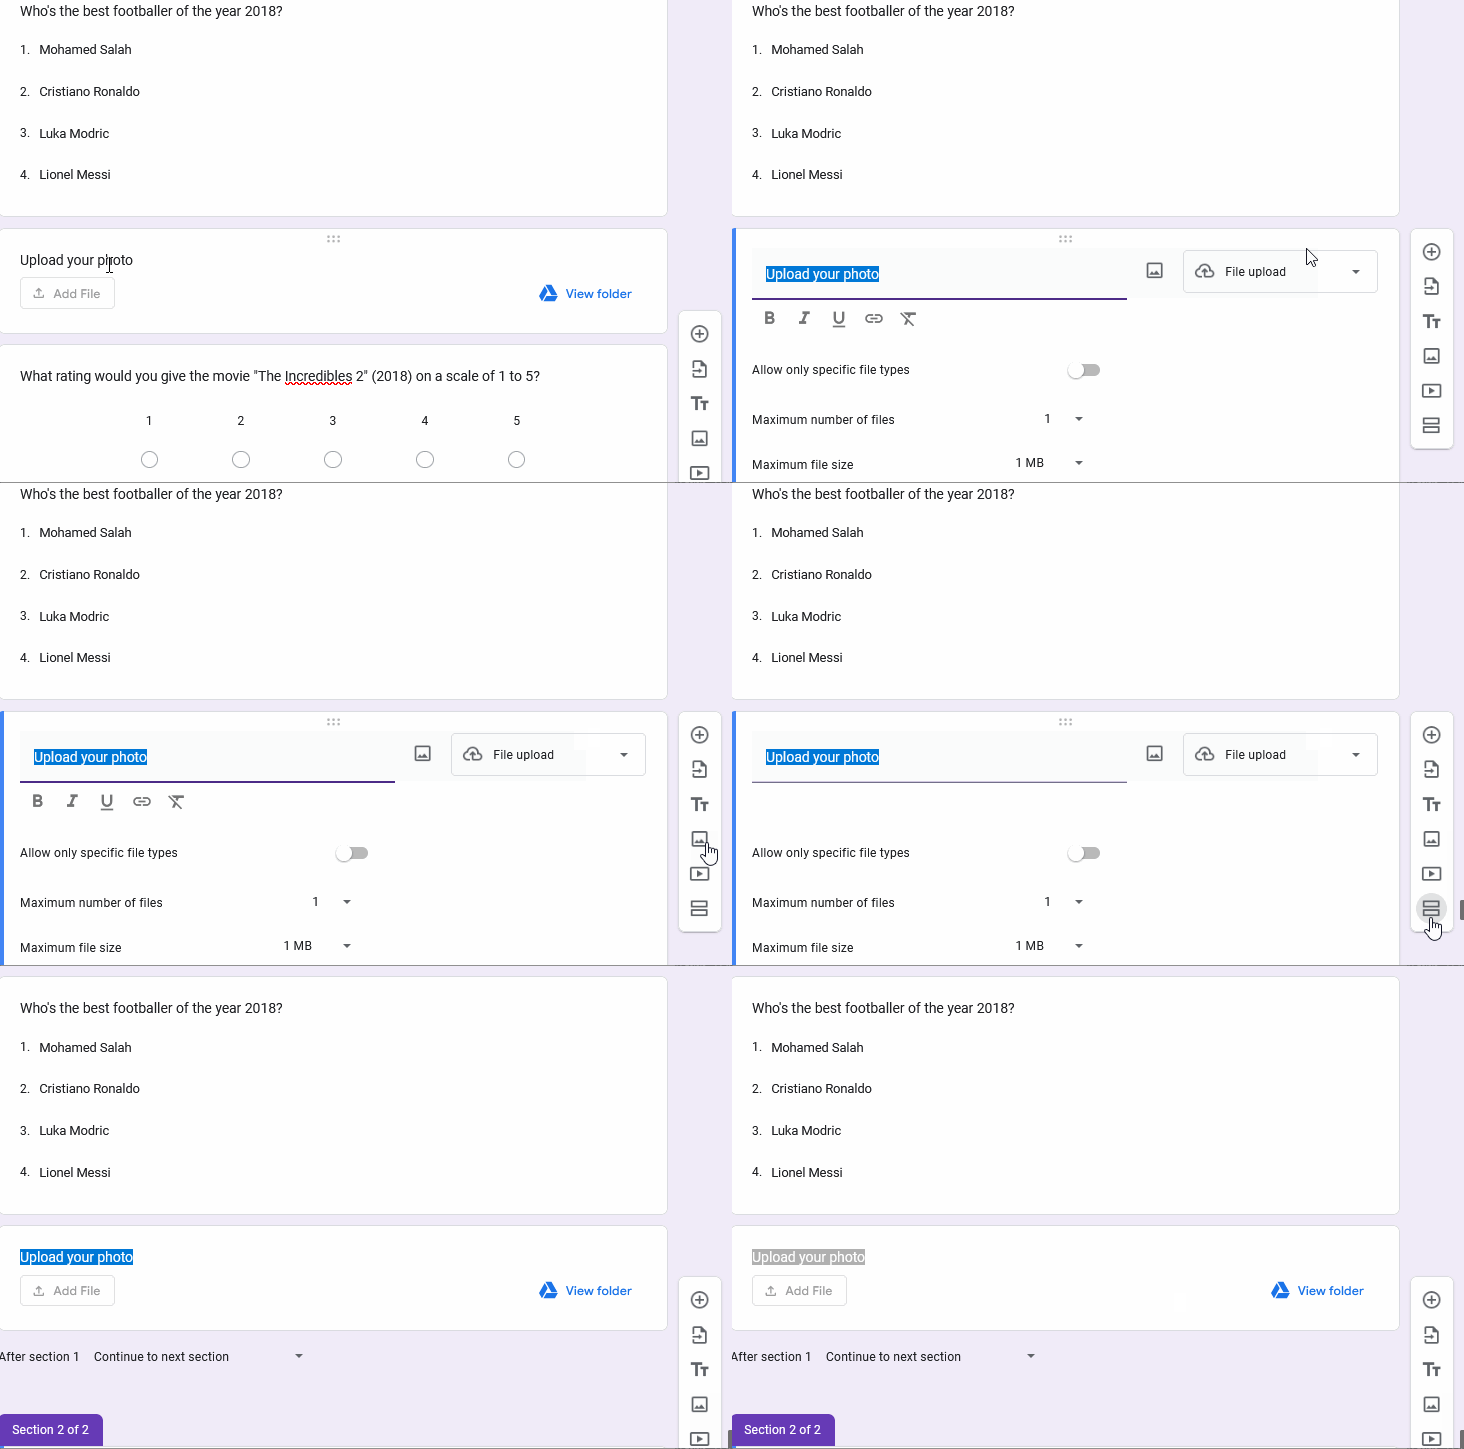
In the following example, I will first add a section below the File upload question in my form and then test the section.
To add a section below the File upload question:
- Click the File upload question that we already added and then the Section button.
- This will insert the section break below the File upload.
To test the section:
- Click the File drop-down question that we already added and then the three dots.
- Select Go to section based on an answer.
- The question in our example is “Who’s the best footballer of the year 2018?”.
- Next to “Luka Modric,” select Continue to next section. Set all other answers to Go to section 1.
- Toggle on Required.
Now, when a respondent chooses a wrong answer, they will not be able to go to the next section by clicking the Next button below the File upload question type where we inserted the section break.
Conclusion
You have learned how to create your first Google Forms form. Here are some important points before we wrap up:
When you add each question, make sure it gives the expected outcome by clicking the Preview button at the top.
Also, click the Settings tab at the top of the form. There you can see a couple of useful settings, such as:
- Make this a quiz
- Collect email addresses
- Limit to 1 response
- Enable confirmation message
All of those settings are self-explanatory.
That’s all about setting up Google Forms forms. I hope you can use this tutorial to create your first professional-looking online form using Google Forms.
Related: Automatically Pre-fill Google Forms from Google Sheets: A Step-by-Step Guide.


