This tutorial will take you through all the necessary steps required to create a SIF file for WPS using Google Sheets.
Why Google Sheets?
Google Sheets is free to use and is a widely popular spreadsheet application.
I am sure that you can successfully create a SIF file for WPS using Google Sheets by following this tutorial. The same steps can also be applied in Excel, but with a slight difference, which I will explain later in this tutorial.
As a side note, the Standard Interchange Format, also known as SIF, is a geospatial data exchange format.
Wages Protection System (WPS)
The Wages Protection System (WPS) is a system that is used in some Middle Eastern countries, such as the UAE and Qatar, to ensure that workers are paid their salaries on time and in full. Under the WPS, employers are required to transfer their employees’ salaries through approved financial institutions, such as banks and bureaux de change.
Creating a SIF file for WPS Salary Transfer
I am familiar with the UAE WPS salary transfer method, and I will try to explain it below. However, even if you are in a different country and want to create a SIF file for salary transfer, you can follow this tutorial, as it will give you a clear picture of the procedure for creating a proper SIF file.
To facilitate electronic salary transfer, employers can send their bank the salary details of their employees in a proper format via email. This format is called the SIF file format, and it is routed through the Central Bank.
The bank may reject your file if it is not in the valid file format or if there is an error in the data. In such cases, you will likely receive an email from the bank pointing out the error. You can then rectify the error and send the file back to the bank.
Creating a SIF file for WPS using Google Sheets
Here is a step-by-step guide on how to create a SIF file for WPS using Google Sheets:
Required details for creating the SIF file name:
- Employer ID (appears on Company Labour Card)
- File Preparation Date (YYMMDD)
- Hour, Minute & Second of Preparation (HHMMSS) (24-hour format)
Use these details to name the SIF file in Google Sheets (this should be the tab name). You can use any name for the file name to easily identify the file later in Google Drive.
SIF file content
The SIF file content contains two types of records: EDR and SCR.
EDR (Employee Detail Record)
The EDR is the Employee Detail Record. There is a separate EDR for each employee.
Get ready with the individual EDR details of your employees separately. You can get these from your HR person who is handling the employee records.
- Labour Card No. of Employee (14 digits).
- Routing Code No. of the Bank, each bank has its own routing code. Just call the bank or check their website for the routing code.
- IBAN No. of the Employee A/c (23 digits). It’s not necessary that your bank account and your employee account should be in the same bank.
- Salary period from (YYYY-MM-DD).
- Salary period to (YYYY-MM-DD).
- Exact Salary Amt.
- Variable Salary.
- No. of Leave taken by the Employee.
We need a few more pieces of information to create the SIF file for WPS using Google Sheets.
SCR (Salary Control Record)
The SCR is the Salary Control Record.
You require the following SCR details. The following details are related to the employer, so treat them accordingly.
- Employer ID appears on the Company Labour Card and with 13 digits.
- Routing Code No. of the Bank (Employer).
- File Creation Date (YYYY-MM-DD).
- File Creation Time (HHMM).
- Salary Period (only Month and Year required in MMYYYY format).
- Total No. of Records (EDRs). If there are 5 employees, the number of EDR above will be 5 and you should put 5 here.
- Exact Salary Amt. This is the total salary of all employees.
Creating a Standard Interchange Format (SIF) File for WPS Using Google Sheets
First of all, open a new Google Sheets file: https://sheets.new/
For example purposes, we will prepare a SIF file for two employees.
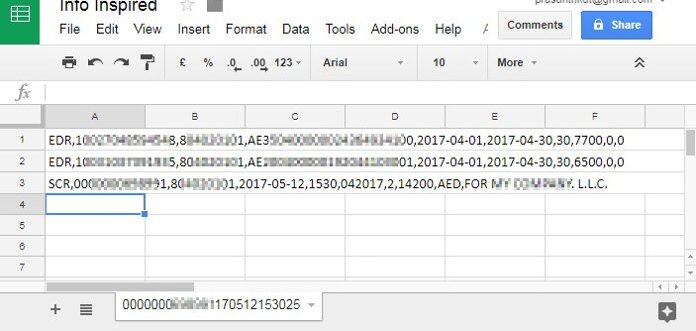
Enter the EDR and SCR details above in the same order in your Sheet but in the format shown below.

More employees mean more EDR records in your data, so prepare your data accordingly.
The screenshot above shows two EDRs, which means that the SIF file we are creating using Google Sheets is for the monthly salary of two employees.
Hope you have completed the above steps.
Now, name your sheet tab as instructed above under the title “Creating a SIF file for WPS using Google Sheets.”
Now, it’s time to convert this Google Sheet file to CSV format. To do this, go to File > Download > Comma-separated values (.csv).
You should first convert your spreadsheet to CSV, then to SIF. You cannot directly convert a spreadsheet to SIF in Google Sheets.
Now, the final stage of creating the SIF file for salary transfer.
Here, we should convert the CSV file to SIF.
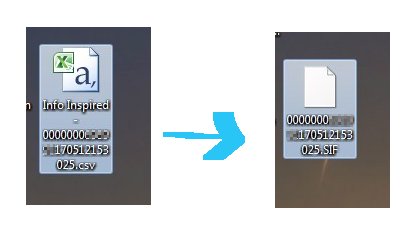
The procedure is simple. Go to the location where you have just downloaded the Google Sheets file in CSV format, right-click on the file, and rename it.
To convert from CSV format to SIF file format, just rename the file extension as shown in the image below.

That’s all.
You can right-click and open this file using Notepad to see the details. Any changes you want to make can be made directly in this file.
Conclusion
Every month, you do not need to prepare the WPS file using Google Sheets. It is not necessary to create the spreadsheet, then CSV, and then the SIF file.
Your existing SIF file is sufficient. Next time, you only need to open the WPS SIF file in Notepad, edit the content, and of course, the file name.
To add more employees, you can insert more EDRs just above the SCR record in Notepad.
The above WPS SIF file creation steps can also be followed in Excel to create a SIF file. However, in Excel, after renaming CSV to SIF, you may need to open the file in Notepad and remove extra spaces between commas.


