")
")


")


")

")
")
 in Excel & Google Sheets")


Managing multiple subscriptions can get messy fast — Netflix, Adobe, Spotify, domain renewals, cloud storage… the list never ends. Missing a renewal or losing track of your monthly spending can happen easily.
That’s where this Google Sheets subscription tracker comes in. It’s a free, fully automated subscription tracker template built in Google Sheets that helps you stay organized, monitor your expenses, and ensure you never miss another renewal.
If you prefer to understand and build it yourself, don’t worry — I’ll walk you through every step of creating your own subscription management spreadsheet from scratch.
Why Use Google Sheets for Subscription Tracking?
Google Sheets is free, powerful, and accessible from any device — your phone, tablet, or laptop. It works both online and offline, and it lets you collaborate in real time with family members or teammates.
In short: you don’t need fancy paid apps. This free Google Sheets template gives you full control, automation, and visualization — all in one place.
What Is a Subscription Tracker in Google Sheets?
A subscription tracker is a spreadsheet that helps you manage all your subscriptions — from start dates and billing cycles to renewal reminders and total costs.
This Google Sheets subscription tracker automates most of the manual work. It handles currency conversion, calculates monthly costs, and dynamically labels each subscription as Active, Not Started, ⚠️ Due Soon, or ❌ Expired.
It even includes built-in charts to help you visualize your spending — both month-by-month and category-wise.
How to Use the Subscription Tracker Template
Getting started with this tracker is simple. Follow these steps to organize all your subscriptions and never miss a renewal again.
Step 1: Make a Copy of the Template
Open the Google Sheets subscription tracker template using the link below, then click Use Template to create your own editable copy.
This ensures you can customize the tracker without altering the original.
The file contains four sheets:
- Subscriptions
- Charts
- Summary
- Drop-Down Lists
You’ll mainly enter data in the Subscriptions sheet. The rest update automatically.
Step 2: Enter Your Subscription Details
Go to the Subscriptions sheet and delete the sample data (A3:H9). Then fill in your own details:
- Service – The name of the platform or app (e.g., Netflix, Adobe CC).
- Category – Choose a category like Entertainment, Software / Utilities, or Design / Creative from column B. You can edit or add categories in the Drop-Down Lists sheet (column D).
- Start Date – The date you first subscribed.
- Last Renewed On – Your most recent renewal date. If not yet renewed, repeat the start date here.
- Billing Cycle – Select Monthly, Quarterly, Semi-Annual, or Yearly.
- Cost and Currency – Enter the amount paid and choose the currency.
- Mode – Specify your payment method (Credit Card, PayPal, etc.).

Next, in cell C1, select your preferred currency (e.g., INR).
Example: if you’re in India and paying for a U.S. service, enter the cost in USD, choose USD in column G, and set INR in C1 — the sheet automatically converts all costs to your chosen currency.
Step 3: Let the Sheet Do the Work
Columns I to M are fully automated. They populate automatically to show:
- ✳️ Cost in INR (or your chosen currency)
- ✳️ Monthly Cost
- ✳️ Next Renewal
- ✳️ Days Left
- ✳️ Status
You don’t need to edit these — they update dynamically based on your entries.
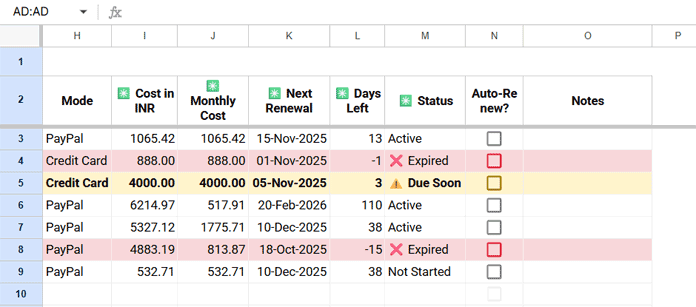
If a subscription auto-renews, tick the box in column N (Auto-Renew?). Add any notes in column O.
The “Auto-Renew?” checkbox is just for reference — it doesn’t affect any formulas or automation in the sheet. Regardless of whether it’s checked or not, you’ll still need to update the Last Renewed On date manually each time a subscription renews (or when you renew it yourself).
Step 4: Review Your Tracker
Once your data is in, your Google Sheets subscription tracker is live.
- Rows marked ⚠️ Due Soon (within 7 days) appear in light orange.
- ❌ Expired subscriptions appear in light red.
These highlights make it easy to spot what needs attention.
Step 5: Visualize Your Data
Go to the Charts sheet for a quick overview:
Your Subscription Journey Through the Year – shows your actual subscription payments per month.

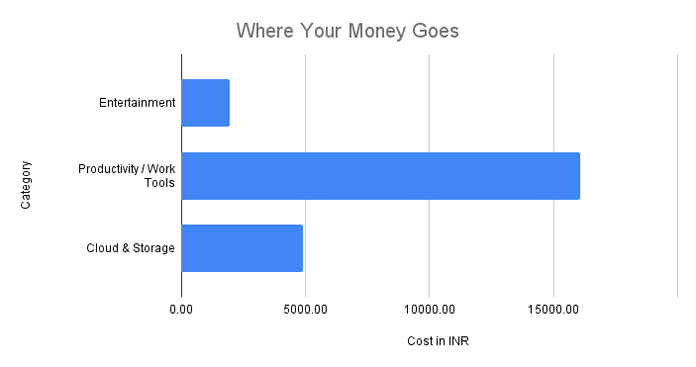
Where Your Money Goes – shows spending by category.
Both update automatically as you add or change subscriptions.
How to Create the Google Sheets Subscription Tracker from Scratch
Even though you can start using the free template instantly, building it yourself gives you full flexibility — and helps you learn how the automation works behind the scenes.
Let’s go step by step.
Step 1: Basic Setup
- Open a new sheet by visiting https://sheets.new.
- Rename it Subscription Tracker Template.
- Add three more sheets using the “+” button.
- Rename them as: Subscriptions, Charts, Summary, and Drop-Down Lists.
Step 2: Preparing the Drop-Down Lists
Currency List
If you pay in multiple currencies, list them first. In the Drop-Down Lists sheet, enter this in columns A and B:
| Currency Code | Currency Name |
|---|---|
| USD | US Dollar |
| INR | Indian Rupee |
| GBP | British Pound |
You can add more as needed.
Category List
In column D, create a list of categories:
| Categories |
|---|
| AI & Automation Tools |
| Cloud & Storage |
| Communication |
| Design / Creative |
| Entertainment |
| Finance & Business |
| Gaming |
| Health & Fitness |
| Learning / Education |
| Lifestyle & Miscellaneous |
| News & Reading |
| Productivity / Work Tools |
| Shopping / Memberships |
| Software / Utilities |
| Web & Hosting |
Step 3: Building the Subscriptions Sheet
In cell A1, type “Preferred Currency.”
In C1, insert a drop-down linked to 'Drop-Down Lists'!A2:A by clicking Insert > Drop-down > Drop-down (from a range) and entering ='Drop-Down Lists'!A2:A

Now add these headers in row 2:
| A | B | C | D | E | F | G | H |
|---|---|---|---|---|---|---|---|
| Service | Category | Start Date | Last Renewed On | Billing Cycle | Cost | Currency | Mode |
In N2 and O2, add Auto-Renew? and Notes.
Then set up the following fields:
- Column B (Category):
Select B3:B → Insert → Drop-down → Drop-down (from a range)
and link it to='Drop-Down Lists'!D2:D. - Column E (Billing Cycle):
Select E3:E → Insert → Drop-down, and manually add these options:
Monthly, Quarterly, Semi-Annual, Yearly. - Column G (Currency):
Copy the drop-down from C1 and paste it into G3:G. - Column N (Auto-Renew?):
Select N3:N → Insert → Tick Box.
Step 4: Adding the Core Formulas
There are five key array formulas powering the automation.
Enter each in the header cell of its column.
I2 – Convert to Preferred Currency
=ArrayFormula(VSTACK("✳️ Cost in "&C1, IF(F3:F=0,,ROUND(IFNA(IF(G3:G=C1, F3:F, MAP(G3:G, LAMBDA(val, GOOGLEFINANCE("CURRENCY:"&val&C1)))*F3:F)), 2))))This converts costs from the payment currency to your preferred currency (from C1).
Note: Google Finance rates may differ slightly from real transaction rates.
J2 – Monthly Cost Calculation
=ArrayFormula(VSTACK("✳️ Monthly Cost", IF(A3:A="", "", ROUND(I3:I/SWITCH(E3:E, "Monthly", 1, "Quarterly", 3, "Semi-Annual", 6, "Yearly", 12, 1), 2)
)))
This converts all costs into monthly equivalents.
K2 – Next Renewal Date
=ArrayFormula(VSTACK("✳️ Next Renewal", IF(D3:D="",,SWITCH(E3:E, "Monthly", EDATE(D3:D, 1), "Quarterly", EDATE(D3:D, 3), "Semi-Annual", EDATE(D3:D, 6), "Yearly", EDATE(D3:D, 12), ""))))Calculates the next renewal date based on Last Renewed On and Billing Cycle.
L2 – Days Left
=ArrayFormula(VSTACK("✳️ Days Left", IF(D3:D="",,K3:K-TODAY())))Shows how many days remain until the next renewal.
M2 – Subscription Status
=ArrayFormula(VSTACK("✳️ Status", IF(L3:L="",,IF(D3:D>TODAY(), "Not Started", IF(L3:L>7, "Active", IF(L3:L<=0, "❌ Expired", IF(L3:L<=7, "⚠️ Due Soon")))))))This formula automatically determines the current subscription status based on the latest renewal and days left.
Status meanings:
- Not Started: The renewed period hasn’t begun yet (Last Renewed On is in the future).
- Active: More than 7 days remain before renewal.
- ⚠️ Due Soon: Renewal due within 7 days.
- ❌ Expired: Renewal date has passed.
Step 5: Formatting the Tracker
- Select row 2 → Format → Wrapping → Wrap.
- While selected → View → Freeze → Up to row 2.
- Adjust column widths as needed.
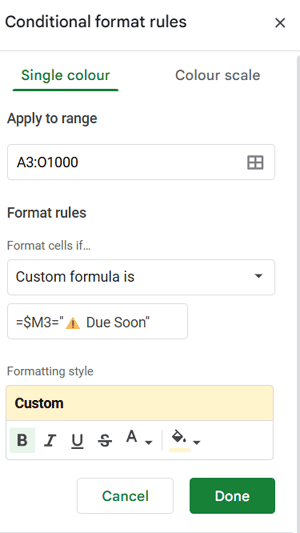
- Apply conditional formatting:
- Select A3:O.
- Format → Conditional formatting.
- Under Format rules, choose Custom formula is and enter
=$M3="⚠️ Due Soon", set fill color to light orange. - Click Add another rule, enter
=$M3="❌ Expired", choose light red fill. - Click Done.
Step 6: Enter Sample Data
Try a few sample entries:
| Service | Category | Start Date | Last Renewed On | Billing Cycle | Cost | Currency | Mode |
|---|---|---|---|---|---|---|---|
| Streaming Service 1 | Entertainment | 15-Oct-2025 | 15-Oct-2025 | Monthly | 12 | USD | PayPal |
| Music Platform | Entertainment | 01-Sep-2025 | 01-Oct-2025 | Monthly | 888 | INR | Credit Card |
| Design Tool | Productivity / Work Tools | 05-Jan-2025 | 05-Oct-2025 | Monthly | 4000 | INR | Credit Card |
| Office Suite | Productivity / Work Tools | 20-Feb-2025 | 20-Feb-2025 | Yearly | 70 | USD | PayPal |
| AI Assistant | Productivity / Work Tools | 10-Mar-2025 | 10-Sep-2025 | Quarterly | 60 | USD | PayPal |
| Cloud Storage 1 | Cloud & Storage | 18-Apr-2025 | 18-Apr-2025 | Semi-Annual | 55 | USD | PayPal |
| Task Manager | Productivity / Work Tools | 10-Oct-2025 | 10-Nov-2025 | Monthly | 6 | USD | PayPal |
Then choose your preferred currency in C1 (e.g., INR).
The automatic columns will update immediately.
Step 7: Calculate Your Total Actual Subscription Payments per Month
Now that your subscription data is ready, let’s summarize how much you actually spend each month.
- Go to your Summary sheet.
- In cell A1, type Month.
- In cell B1, enter:
=Subscriptions!I2
This pulls the header from your converted preferred currency column (for example, “✳️ Cost in INR”). - In cells A2:A13, list all the months — January through December.
- Next, in cell B2, paste this formula:
=ArrayFormula(SUMIF(TEXT(Subscriptions!D3:D, "MMMM"), A2:A13, Subscriptions!I3:I))
This formula automatically sums up your total actual payments per month based on each subscription’s Last Renewed On date.
That’s it! You now have a quick monthly breakdown showing when and how much you’ve actually spent — in your preferred currency.
Step 8: Visualizing Data with Charts
Let’s add two bar charts for better insights.
Chart 1 – Your Subscription Journey Through the Year
- Go to the Summary sheet.
- Select columns A and B.
- Click Insert → Chart.
- In the Chart Editor:
- Chart type → Bar chart
- Customize → Chart & Axis Titles → enter “Your Subscription Journey Through the Year”
Chart 2 – Where Your Money Goes
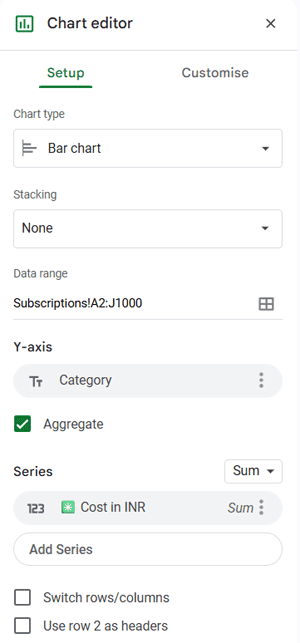
- Go to the Subscriptions sheet.
- Select A2:J.
- Insert → Chart.
- Choose Bar chart.
- Under Series, keep only ✳️ Cost in INR.
- Set the Y-axis to Category and enable the Aggregate option below it.
- Add a title: “Where Your Money Goes.”
Then copy both charts to the Charts sheet and delete the temporary versions from their sources.
That’s it — your Google Sheets subscription tracker is fully set up and ready to use!
FAQs: Google Sheets Subscription Tracker
1. Can I use this template in Excel instead of Google Sheets?
This specific template uses Google Sheets functions such as GOOGLEFINANCE() and ARRAYFORMULA(), which won’t work in Excel.
2. How often does the currency conversion update?
Google Sheets automatically refreshes exchange rates using the GOOGLEFINANCE function approximately every few hours while the sheet is open. Keep in mind that this data is typically delayed by up to 20 minutes, and the actual bank or interbank rates you receive may differ slightly from Google’s published rate.
3. Can I add custom billing cycles (like bi-monthly or weekly)?
Yes! In the Billing Cycle drop-down (column E of the Subscriptions sheet), you can edit and add new cycle types. Just make sure to adjust the SWITCH() formula in the Monthly Cost and Next Renewal columns accordingly.
4. Will the charts update automatically?
Absolutely. Both “Your Subscription Journey Through the Year” and “Where Your Money Goes” refresh instantly as you add or change data in the Subscriptions sheet.
5. Can I share the tracker with family members or teammates?
Yes — just click Share in Google Sheets and set appropriate permissions. Everyone can collaborate in real time.
6. Is my data private and secure?
Your data stays entirely within your Google Drive account. No third-party apps or integrations are involved, so you retain full control and privacy.
Final Thoughts / Conclusion
You’ve just built a fully automated Google Sheets subscription tracker — complete with live currency conversion, dynamic status updates, renewal reminders, summaries, and category-wise charts.
With everything in one place, you’ll always know where your money goes — and when your next renewal is due.
This single sheet helps you stay financially organized, avoid surprises, and make smarter budgeting decisions month after month.
Start using it today, and let Google Sheets handle the math while you focus on what really matters.