In this tutorial, I will guide you through the process of reverting to a previous version in Google Sheets and also creating a copy of it.
Recently, I experimented with a Google Spreadsheet file where I created a sheet capable of converting any given numbers within a specific range into their corresponding words.
You May Like:- How to Convert Numbers to Words in Google Sheets: Easy Formula Tutorial
During a recent revisit to the file as part of another experiment, I inadvertently made changes to the master sheet without creating a copy. Some of these changes were auto-saved, and since the file is shared with other users, I need to revert to the previous version.
To address this, I swiftly reversed the changes, fortunately able to utilize the Version History feature to revert to a prior state. I’ll walk you through the steps.
In this tutorial, I’ll demonstrate how to access version history in Google Spreadsheets to revert to a previous version and also how to completely remove the revision history when needed.
Steps to Revert to a Previous Version of a Google Spreadsheet File
Here are the steps to follow to revert to a previous version of a Google Sheets file.
- Begin by opening the file for which you wish to access the revision history.
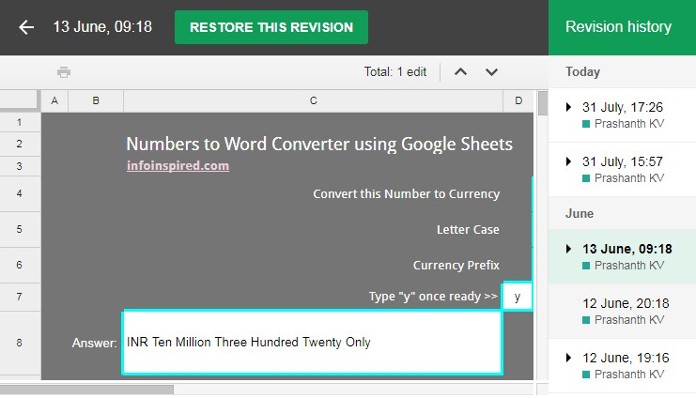
- Navigate to the File menu and select “Version history” > “See version history.”
- On the right-side panel of your spreadsheet, you will find a list of revisions for the file that you can revert to.
- Carefully review the revisions and click on the one you wish to restore. Then, click the button labeled “Restore this version.”
Allow Google Sheets sufficient time to complete the restoration process. That’s it! You have successfully reverted your spreadsheet to a previous date.
Making a Copy of a Previous Version
Instead of reverting to a previous version of your Google Sheets file, you can create a copy of the desired version. Follow the instructions below:
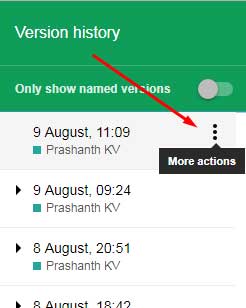
- Within the file, click on “File” > “Version history” > “See version history.”
- Locate the version you want to duplicate without affecting the current sheet.
- Hover your mouse over the version to reveal a three-dotted drop-down menu.
- Click on that menu and select “Make a copy.” This will generate a copy of your old revision.
Steps to Completely Remove Revision History in Google Sheets
Google Sheets does not provide an option to delete the revision history intentionally, which is a wise decision on Google’s part.
To eliminate the revision history, follow these steps:
- Make a copy of the current file by going to the “File” menu and selecting “Make a copy.”
- Once the copy is created, the new file won’t retain any previous revision history.
- To remove the old file, navigate to your Google Drive, locate the original file, and delete it.
Please note that if the older file has been shared with others, they will lose access. You need to consider sharing the new file with them.
By following these steps, you can successfully eliminate the revision history of your Google Sheets file.
What are Named Versions in Version History in Google Sheets?
Google Sheets allows you to create named versions, providing a way to label the current version with a specific name. To do this, go to “File” > “Version history” > “Name current version.” Enter the desired text (name) in the provided field and click “Save.”
You can create a maximum of 40 revisions in this manner.
Why is it important to create named versions of files in Google Sheets?
Google Sheets typically merges versions to conserve space, but named versions remain unaffected by this process.
Resources
We have discussed the process of reverting to an older version of a Google Sheets file. Additionally, we have explored creating a separate copy of a Google Sheets revision.
The first two tutorials below explain the process of sharing a Google Sheets file in two different modes. The last one explains creating a salary information file (SIF) in Google Sheets.


