


")


")

")
")
 in Excel & Google Sheets")


If you are looking for a ready-to-use invoice template in Google Sheets, you’re in the right place.
Below, you’ll find a download link to a free invoice template along with clear instructions on how to fill it, calculate totals automatically, and create professional invoices — without using any scripts or add-ons.
This template is designed for global users. It supports multiple currencies and can even convert the payable amount into words using either the Global (Million/Billion) or Indian (Lakh/Crore) numbering system.
Google Sheets invoice template full preview

Step 1: Open the Invoice Template
Click the button below to preview and copy the pre-designed Google Sheets invoice template.
The template provides clearly labeled fields for:
- Company and client details
- Invoice number and date
- Itemized table (Quantity, Description, Unit Price, Tax %, Line Total)
- Subtotal, Tax, Total, and Amount in Words
- Payment and bank information
Step 2: Change Currency (Global-Friendly)
The template includes two sheets: Invoice and Setup.
All currency-related settings are managed in the Setup sheet. In this step, you’ll learn how to enter these details correctly to get the most out of this free Google Sheets invoice template.
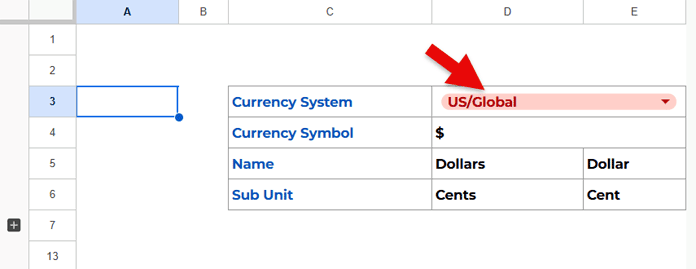
1. Choose the Currency Numbering System
In the Setup sheet, cell D3 has a drop-down with two options:
- US / Global – Uses Million, Billion, Trillion, etc.
- Indian – Uses Lakh, Crore, etc.
Choose the option that matches your country’s numbering system.
2. Enter the Currency Symbol
In cell D4, enter your currency symbol (for example: $, ₹, €, Rs).
All monetary values in the Invoice sheet will automatically display the selected symbol.
3. Enter Currency Names
Enter the currency details as follows:
- D5 → Currency name (plural)
- E5 → Currency name (singular)
- D6 → Subunit name (plural)
- E6 → Subunit name (singular)
The template uses these values to convert the payable amount into words.
Examples
India / Sri Lanka / Europe
India:
- Currency System: Indian
- Currency Symbol: ₹
- Currency Name: Rupees | Rupee
- Subunit: Paise | Paise
Sri Lanka:
- Currency System: Indian
- Currency Symbol: Rs
- Currency Name: Rupees | Rupee
- Subunit: Cents | Cent
Europe:
- Currency System: US / Global
- Currency Symbol: €
- Currency Name: Euros | Euro
- Subunit: Cents | Cent
These are the values you need to enter in the Setup tab of the invoice template.
Step 3: Fill in Company & Client Details
Now let’s create the invoice.
Go to the Invoice tab and replace the existing sample data.
- At the top-left corner, you’ll see an image box labeled “Your Logo Here”.
Click it and press Delete to remove it. - Go to Insert → Image → Insert an image over cells.
- Insert your company logo and resize it by dragging the edges.
Next:
- Enter your company name in cell D2
- Enter your company address and contact details in D4:K7 (merged range)
- Enter your client’s details (name, address, contact) in A10:G12 (merged range)
The template will keep everything neatly formatted for printing or sharing.
Step 4: Add Your Invoice Items
For each row in the itemized table, enter:
| Column | What to Enter |
|---|---|
| Quantity | Number of units sold |
| Description | Product or service name |
| Unit Price | Price per unit (numbers only) |
| Tax % | Applicable tax rate |
Automation
The template calculates the line total automatically using this formula:
=ARRAYFORMULA(IF(I16:I23="",,I16:I23*K16:K23*(1+M16:M23)))The template already includes three sample items. You can replace them with your own.
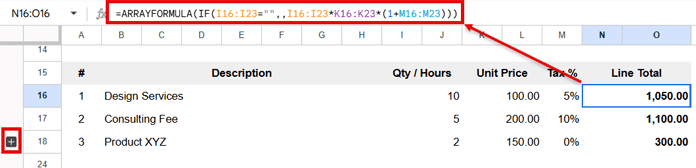
If you need more rows:
- Click the + icon on the left to reveal five additional rows.
- Even if you don’t plan to use them, you can keep them visible to add spacing in the printed invoice.
Step 5: Check Totals
The totals are calculated automatically in the range N25:O27:
- Subtotal (Before Tax):
N25:O25(merged) - Total Tax:
N26:O26(merged) - Amount Payable:
N27:O27(merged)
The correct currency symbol is applied based on your Setup selections.
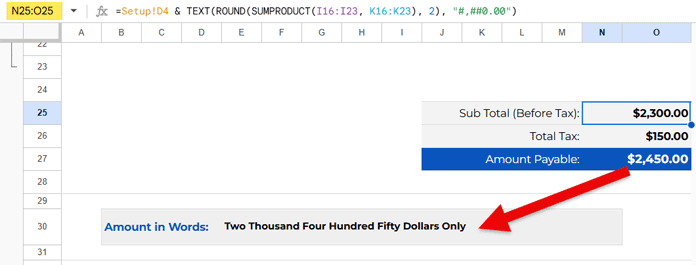
Additionally, the amount payable is converted into words and displayed in the merged range E30:N30 using a reference to Setup!C12.
The wording automatically adjusts based on:
- The numbering system (Global or Indian)
- The currency name and subunit names you entered
All conversion logic is handled inside the Setup sheet. Those rows are grouped and hidden by default. Click the + button in the Setup sheet to view the formulas.
These formulas are explained in detail in my tutorial: Convert Numbers to Words in Google Sheets (US & Indian Formats)
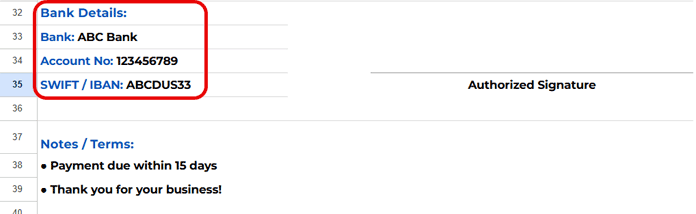
Step 6: Enter Bank Details
Enter your bank and remittance details in the range A33:A35.
Step 7: Print or Share Your Invoice from Google Sheets
- Enter the invoice number, date, and payment terms in L11:O13
- Add any additional notes in A38:A39
The invoice is pre-configured to print correctly in A4 (Portrait) mode.
Go to File → Print and adjust settings if needed.
You can also download the invoice as a PDF or share it directly from the File menu.
Why Use This Google Sheets Invoice Template
This Google Sheets invoice template requires no scripts, macros, or add-ons and works seamlessly with any currency and tax rates. The amount in words updates automatically, ensuring accuracy and professionalism, while the clean, print-ready design makes it suitable for both digital sharing and physical invoices.
FAQs
How do I reuse the invoice template?
Create a new copy using File → Make a copy. Do not duplicate the sheet, as it will continue to reference the same Setup sheet.
Why is this Google Sheets invoice template a better option?
You can share the invoice with view-only access for approval before printing or sending it, helping avoid mistakes and rejections.
Can I use different currencies and tax rates?
Yes. You can easily change the currency, numbering system, and tax rates from the Setup sheet.
Does the template calculate totals automatically?
Yes. Line totals, subtotal, tax, grand total, and the amount in words update automatically as you enter items.
Conclusion
This tutorial helps anyone get started with invoicing in Google Sheets quickly — even without technical knowledge.
At the same time, you get hands-on experience with some modern Google Sheets techniques that you won’t usually see in standard invoice templates, especially the multi-system amount-to-words converter.
Feel free to share your thoughts or suggestions in the comments below.