This tutorial provides a free download link to a modern Shared Expense Calculator for Excel 365, along with the formula used and a detailed explanation of how it works behind the scenes.
You don’t need to set up anything to start calculating your shared expenses — it’s a smart, ready-to-use template that does all the work for you.
Key Features of the Shared Expense Calculator
The Shared Expense Calculator in Excel 365 is designed to make tracking group expenses effortless and accurate. It stands out with the following key features:
- Supports small to large groups
- Handles multiple days of expenses
- Uses a single dynamic formula — one formula returns the entire summary showing who owes or is owed in the group
- No helper rows or columns required
- Built with modern Excel functions
Introduction
When you travel in groups and share expenses, you often need to know how much each person spent and how much they owe or should be reimbursed.
At first, this may sound simple — just total all expenses, divide by the number of people, and settle the difference based on what each person paid.
But what if you spent $1,000 on a boat trip that only three people (including you) joined, while the rest didn’t? Things quickly get complicated when there are several such partial expenses.
That’s exactly where this simple-to-use Shared Expense Calculator becomes handy. It uses modern Excel 365 functions like BYROW, GROUPBY, and others to dynamically calculate balances for each member.
Note: This template won’t work in older versions of Excel or in Google Sheets, since some of the functions aren’t available there.
For Google Sheets users, a separate template is available — the link is included in the Resources section below.
Using the Shared Expense Calculator
The template uses a single spreadsheet named ‘Trip Expn’, since no helper ranges or extra sheets are required.
Columns B to F display the summary section, where the Shared Expense Calculator results appear automatically.

Let’s first understand what this summary shows, and then we’ll look at where to enter your data.
Summary Section of the Shared Expense Calculator
The summary is located in the range B to F, which contains five columns labeled as follows:
- Person – Members of the group (for example, the team traveling together on a trip)
- Total Amount Paid – Total amount paid by each member
- Individual Amount Owed – How much each person is responsible for paying in the shared expenses
- Net Balance (Paid – Owed) – Shows how much a person is owed (positive) or owes (negative)
- Status – Displays whether the person Is Owed, Owes, or is Settled ✅
Status definitions:
- Owes – The person has paid less than their fair share → they need to pay money to settle up.
- Is Owed – The person has paid more than their fair share → they should receive money from others.
- Settled – The person’s balance is zero → no money is owed or due.
You don’t need to make any changes in this section — it’s auto-generated by the Shared Expense Calculator formula.
A single dynamic formula placed in cell B2 produces this entire report instantly, without any helper columns or manual steps.
Data Entry Section of the Shared Expense Calculator
This section requires careful attention — entering the data systematically ensures the Shared Expense Calculator works correctly.
Step 1: Enter Group Member Names
Start by entering your group members’ names beginning from cell L2 across the row. The template comes with 5 dummy names that you can overwrite.
- If your group has fewer than 5 members, delete the extra columns.
- If your group has more than 5 members, continue entering names — the table will automatically expand to accommodate them.
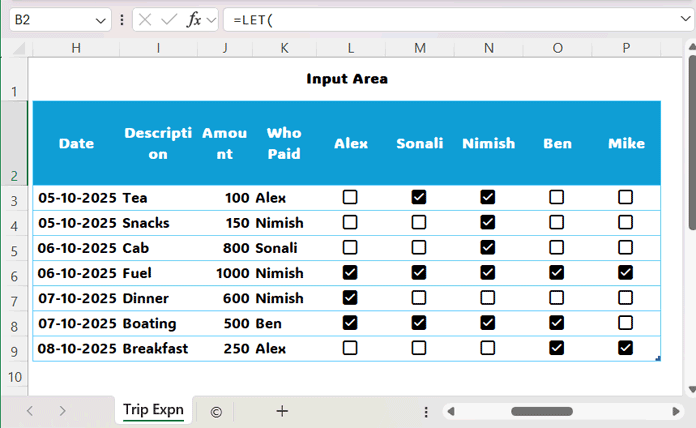
Step 2: Enter Transaction Details
- Enter the date of the transaction in column H and the description in column I (optional).
- Enter the amount paid in column J.
- Select the person who paid from the dropdown in column K.
Example:
If Alex paid $100 for Tea:
- Enter 100 in column J
- Select Alex in column K
Note: If multiple people paid for the same tea expense (e.g., Alex and Nimish each paid $50), enter two separate rows — one for each person with their respective amounts.
Step 3: Select Participants for Each Expense
Use the checkbox columns to indicate which members actually used or benefitted from the expense. This ensures the calculation splits correctly.
Step 4: Continue Entering Data
- The template comes with 7 dummy rows to help you get started.
- If you have fewer expenses, you don’t need to delete the empty rows — they can stay.
- If you have more expenses, just continue entering data — the table will grow automatically.
That’s it! It’s that simple to use this modern Shared Expense Calculator.
✅ Tip: Don’t worry about accidentally deleting formulas — the template uses only a single dynamic formula to generate the entire summary.
Formula and Explanation
The formula in cell B2 generates the entire shared expense summary in one go. No other formulas are used:
=LET(
  table, SourceData,
  cols, 4-COLUMNS(SourceData),
  checkbox, TAKE(SourceData,,cols),
  header_names, TAKE(SourceData[#Headers],, cols),
  individual_share, TOCOL(IF(checkbox, SourceData[Amount]/BYROW(checkbox, LAMBDA(r, COUNTIF(r, TRUE))), 0)),
  participants, TOCOL(IF(LEN(checkbox), header_names,"")),
  total_share, GROUPBY(participants, individual_share, SUM,,0, 1),
  total_contribution, SUMIF(SourceData[Who Paid], CHOOSECOLS(total_share, 1), SourceData[Amount]),
  net_balance, total_contribution-CHOOSECOLS(total_share, 2),
  VSTACK(
    HSTACK("Person", "Total Amount Paid", "Individual Amount Owed", "Net Balance (Paid - Owed", "Status"),
    HSTACK(
      CHOOSECOLS(total_share, 1),
      total_contribution,
      CHOOSECOLS(total_share, 2),
      net_balance,
      IFS(net_balance>0, "Is Owed", net_balance<0, "Owes", net_balance=0, "Settled ✅")
    )
  )
)
How the Shared Expense Calculator Formula Works
- Calculate Individual Share
TOCOL(IF(checkbox, SourceData[Amount]/BYROW(checkbox, LAMBDA(r, COUNTIF(r, TRUE))), 0))- Returns the individual share of each expense based on who availed the service.
- Get Participants
TOCOL(IF(LEN(checkbox), header_names,""))- Returns the names of participants corresponding to each shared expense.

- Aggregate Total Share per Participant
GROUPBY(participants, individual_share, SUM,,0, 1)- Returns a table with unique participants in one column and their total shared expenses in another.
- Calculate Total Contribution
SUMIF(SourceData[Who Paid], CHOOSECOLS(total_share, 1), SourceData[Amount])- Returns the total amount paid by each participant (the “Payer” column).
- Calculate Net Balance
total_contribution - CHOOSECOLS(total_share, 2)- Computes the net balance for each participant:
- Positive → Is Owed
- Negative → Owes
- Zero → Settled ✅
- Stack Columns to Form the Summary Table
VSTACKandHSTACKcombine all columns into the final summary table.IFSdetermines the Status column based on the net balance:
IFS(net_balance>0, "Is Owed", net_balance<0, "Owes", net_balance=0, "Settled ✅")This single formula solution powers the Shared Expense Calculator — no helper columns, no additional formulas, and it updates dynamically as you enter new data.
FAQs
Q1: Can I use this Shared Expense Calculator in Google Sheets?
A: No, some of the modern Excel functions (like TAKE and GROUPBY) are not available in Google Sheets. A separate Google Sheets template is available in the Resources section.
Q2: Can I use this template for a large group?
A: Yes, the calculator supports both small and large groups and multiple days of expenses.
Q3: What happens if I delete a row accidentally?
A: The template automatically updates with the remaining data. Just avoid deleting the formula in cell B2.
Q4: Can I split expenses unevenly?
A: Yes! Only check the members who actually availed each expense — the calculator will split amounts accordingly.


